The Ultimate Parent’s Guide to Dirt Bikes for 9-Year-Olds (2024)
That moment is both thrilling and terrifying. Your nine-year-old looks up at you, eyes wide with a mix of hope and determination, and asks for their first “real” dirt bike. You remember the freedom of two wheels, the smell of fresh air and gasoline, but now it’s your child in the helmet. The questions flood in: Are they ready? What size is safe? Gas or electric? How do I even start?
As a parent and off-road enthusiast for over 15 years, I’ve helped dozens of families navigate this exact exciting crossroads. I’ve also seen the consequences of well-meaning but misinformed choices. This guide is designed to cut through the confusion. We’ll combine hands-on experience, certified safety knowledge, and thorough research to help you find a bike that prioritizes your child’s safety, skill development, and pure fun. Let’s transform that nervous excitement into confident action and find the perfect Dirt Bikes for nine year olds.
Why Age 9 is a Critical Time for a First Dirt Bike
Nine is a sweet spot in a child’s development, making it an ideal age to introduce a proper entry-level dirt bike. It’s less about the calendar and more about the convergence of key factors.
- Physical & Cognitive Readiness: The average nine-year-old has developed significantly in strength, coordination, and balance compared to just a year or two prior. They can typically handle the weight of a small bike (and, crucially, pick it up after a tip-over). More importantly, their cognitive abilities allow them to understand and remember multi-step safety instructions, anticipate consequences, and exercise a degree of impulse control—all vital for safe riding.
- Transition from Play Vehicles: Many kids this age have “graduated” from toy-grade, battery-powered ride-ons. A beginner dirt bike represents the next logical step—a machine with legitimate suspension, real controls, and the capacity to teach genuine mechanical skills. It’s the shift from play to sport.
- Building a Foundation: Starting at this age with the rechts bike sets the trajectory for a lifetime of responsible riding. It’s the perfect time to instill core habits: pre-ride checks, respect for the machine, and an understanding of risk management. A positive, confidence-building experience now can foster a lifelong passion for motorsports and the outdoors.
Top 5 Safety Priorities You Cannot Ignore
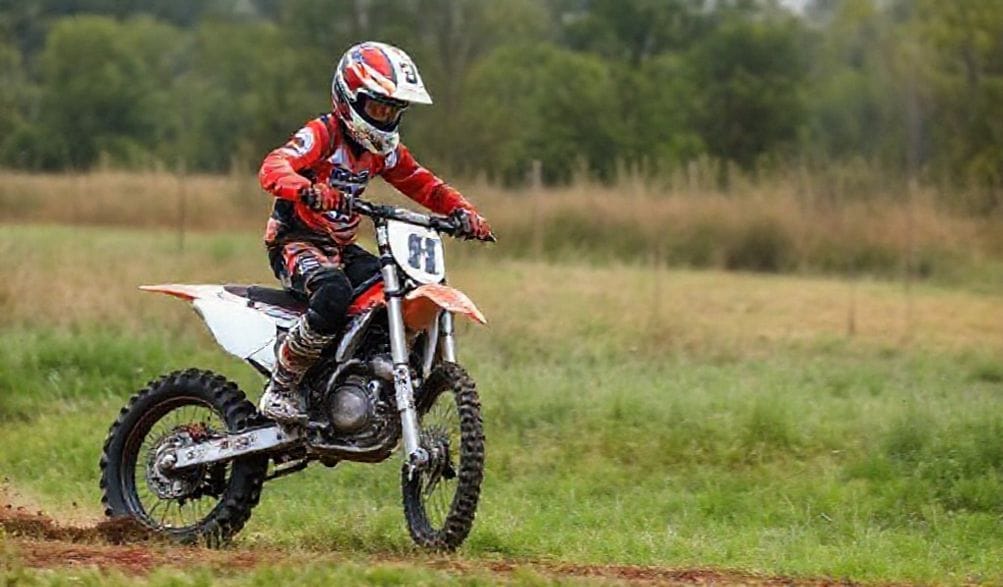
Before we discuss a single make or model, safety is the non-negotiable foundation. Gear and environment aren’t accessories; they are essential equipment.
The Essential Safety Gear Checklist (Head-to-Toe)
Consider this gear as mandatory as the bike itself. Never compromise on quality here.
* Helm: Muss DOT-certified mindestens; Snell or ECE certification is better. It must fit snugly without being painful. Replace after any significant impact.
* Schutzbrille: Scratched or fogged lenses are dangerous. Get a quality pair with a tear-off system and good ventilation.
* Handschuhe: Protects hands from blisters, branches, and falls. Look for padded palms and knuckle protection.
* Stiefel: Not sneakers. Proper youth motocross boots provide critical ankle support, protection from impacts, and a firm grip on the footpegs.
* Brustschutz: Shields the torso, ribs, and back from roost, falls, and handlebar impacts.
* Knee/Elbow Pads or Guards: Simple sleeve-style pads are a great start for beginners.
* Jersey & Pants: Durable, breathable motocross-specific clothing protects against abrasions and elements.
Choosing the Right Riding Environment
Where your child rides is as important as what they ride.
* Supervised & Controlled: Start in a wide-open, flat field—a vacant lot, a farmer’s field (with permission), or a designated practice area. Avoid public trails or areas with unknown hazards, traffic, or steep inclans initially.
* Formal Training: Der MSF DirtBike School or local riding clinics are invaluable investments. Professional instructors teach fundamentals in a structured, safe environment, often accelerating the learning curve and safety awareness dramatically.
Parental Supervision and Education
You are the coach, spotter, and chief safety officer.
* Active Coaching: Don’t just watch. Be engaged. Talk through maneuvers, demonstrate controls, and provide calm, clear feedback.
* Pre-Ride Checklists: Make it a ritual. Together, check tire pressure, chain tension, throttle operation, and brakes before every ride.
* Set Boundaries: Establish clear, non-negotiable rules: gear must be worn, riding areas are predefined, and the bike is shut off when not actively riding.
How to Choose the Perfect Dirt Bike: A 5-Step Framework
Forget brand loyalty for a moment. Follow this framework to find the machine that matches your child’s physical size and skill level.
Step 1: Engine Size & Type (Gas vs. Electric)
This is the most common starting point, but it shouldn’t be the only one.
* Gas (cc): For beginners, look at 50cc to 110cc four-stroke engines. They offer manageable, predictable power. A 50cc is typical for smaller or first-time riders, while a 110cc can suit a taller or slightly more experienced nine-year-old.
* Electric (Voltage/Wattage): Measured in volts (e.g., 24V, 36V). Electric bikes offer instant, silent torque, simpler controls (often just a throttle and brake), and almost zero maintenance. They’re fantastic for learning fundamentals in noise-sensitive areas. The trade-off is limited run-time and recharge needs.
Step 2: The Critical Factor: Seat Height & Fit
This is the single most important factor. A bike that’s too tall is intimidating and dangerous; one that’s too small is uncomfortable and outgrown quickly.
* The “Tip-Toe” Test: With the bike upright (not on a kickstand), your child should be able to place the balls of both feet on the ground comfortably. If they are flat-footed, the bike is likely too small.
* How to Measure: Have your child stand in socks against a wall. Place a book between their legs, spine up, and pull it snug to the crotch. Measure from the top of the book to the floor. This is their inseam. Compare this to the bike’s listed seat height. A good rule is a seat height within 1-3 inches of their inseam.
* Quick-Reference Size Chart:
* Inseam 22-24”: Look for seat heights ~21-23” (e.g., small electric bikes, some 50cc models).
* Inseam 24-26”: Look for seat heights ~23-25” (e.g., most 50cc, some 110cc).
* Inseam 26-28”: Look for seat heights ~25-27” (e.g., most 110cc bikes).
Step 3: Weight of the Bike Matters
A lightweight bike is a confidence-builder. A child who can easily maneuver the bike and pick it up after a fall will progress faster and have more fun. Electric bikes often have a weight advantage due to no engine/oil/gas, but battery packs can add heft.
Step 4: Automatic Clutch vs. Manual Transmission
- Automatic Clutch (Semi-Auto): The gold standard for beginners. The bike has a manual foot-shift, but no hand-operated clutch lever. This allows the child to learn shifting without the complexity of clutch coordination. Most entry-level gas bikes (Honda CRF110F, Yamaha TT-R110E) use this system.
- Full Manual: Requires operating a hand clutch and foot shifter simultaneously. Steeper learning curve, better for a child with prior experience (e.g., on a manual-shift ATV) or after mastering a semi-auto.
Step 5: New vs. Used – What to Look For
- Neu: Pros include warranty, known history, and latest safety features. It’s a turn-key, worry-free start.
- Gebraucht: Can offer significant savings. Inspection is key:
- Frame & Forks: Look for cracks, bends, or major rust.
- Bearings & Suspension: Check for smooth movement in the steering head, wheels, and swingarm. Do the forks and shock compress and rebound?
- Brakes & Tires: Levers should feel firm; pads and rotors should have life. Tires should have decent tread.
- Suchen Sie genau nach Rissen, Verbiegungen oder reparierten Schweißnähten, insbesondere im Bereich des Lenkkopfs und der Federungsaufnahmen. It should start easily (when cold), idle smoothly, and not smoke excessively. Listen for loud knocking or rattling.
2024’s Best Dirt Bikes for 9-Year-Olds: Expert Breakdown
Here are balanced, category-specific recommendations based on the framework above. The “best” bike is the one that fits Ihre child.
Top Gas-Powered Picks
- Honda CRF110F: The benchmark. Renowned for bulletproof reliability, a friendly 110cc engine, semi-auto transmission, and adjustable throttle limiter for total beginners. Seat height: ~26”. It’s the “do everything” trail bike that grows with skill.
- Yamaha TT-R110E: Honda’s direct competitor and equally excellent. Offers similar reliability, a 110cc engine, and a low seat height (~25.6”). Known for a slightly plusher suspension feel. You truly can’t go wrong with either the Honda or Yamaha.
- Kawasaki KLX110: Another fantastic option in the 110cc class. Features a low seat height (~25.8”) and a reputation for a crisp, responsive engine. Often a contender on price and availability.
Top Electric Dirt Bike Picks
- Razor MX650: A popular and accessible entry point. Offers a motocross-style look, variable speed control, and a quiet hub motor. Best for lighter riders and flat, open areas. It’s a great “first taste” before stepping up to a more capable electric or gas bike.
- Oset 24.0: A serious electric trials bike from the industry leader. Lightweight, incredibly torque-y, and built for skill development. Its low seat height and trials geometry teach exceptional balance and throttle control. It’s a purpose-built skill machine.
- Sur-Ron Storm Bee: For the taller or more experienced nine-year-old ready for more power and full suspension. A higher-end electric option that bridges the gap between toy and performance machine.
The “Mini” Motocross Option: For the Aspiring Racer
- Bikes like the Cobra CX50 or KTM 50 SX: These are nicht beginner trail bikes. They are high-strung, competition-oriented two-strokes with aggressive powerbands (often with a “power valve” hit). They demand constant maintenance and are intended for supervised motocross track use with a child who has racing aspirations. Only consider this if you are a highly experienced rider/mechanic committed to the sport.
Getting Started: Your Family’s First 30 Days
The bike is home. The gear is ready. Now what?
Pre-Ride Setup and Maintenance Basics
- Assembly: Follow the manual meticulously. Properly torque bolts, especially on the handlebar clamp, axles, and brake components.
- Initial Checks: Inflate tires to the recommended PSI (often 12-15 psi). Check and adjust the chain slack (about 1-1.5 inches of play). Ensure all controls move freely.
- Teach Maintenance: Make them part of the process. Show them how to check tire pressure, clean the air filter, and lubricate the chain. It builds responsibility and a connection to the machine.
The First Riding Lesson Plan
- The Introduction: With the engine off, have them sit on the bike. Point out the throttle, brakes, kill switch, and shifter. Have them practice squeezing the front brake lever.
- Power-Walking: In einem sicheren, offenen Gelände lassen Sie sie das Fahrrad im Sitzen schieben, wobei sie die Füße zum Ausbalancieren nutzen, um ein Gefühl für sein Gewicht zu bekommen.
- Gas- & Bremsensteuerung: Starten Sie das Motorrad. Lassen Sie sie üben, sanft Gas zu geben und wieder zu nehmen, und dann die Bremsen zum Anhalten zu betätigen. Eine ganze Übungseinheit diesem Thema widmen.
- Erster Gang & Achten: Sobald die Gassteuerung passabel ist, führen Sie den ersten Gang ein. Üben Sie langsame, weite Achten, wobei der Fokus auf der Nutzung der Hinterradbremse zur Geschwindigkeitskontrolle liegt, nicht auf ruckartigem Schließen des Gases.
Fähigkeiten schrittweise aufbauen und den Spaß erhalten
- Mini-Ziele setzen: “Heute meistern wir das sanfte Anhalten.” “In dieser Einheit fahren wir 10 perfekte Kreise.” Feiern Sie diese Erfolge.
- Übungen einsetzen: Stellen Sie Pylonen für Slalom, Bremsmarkierungen und kleine Kreise auf. Übungen bauen auf entspannte Weise Muskelgedächtnis auf.
- Positive Verstärkung: Konzentrieren Sie sich auf das, was sie richtig gemacht haben. Halten Sie die Einheiten kurz (30-45 Min.), um Ermüdung und Frustration zu vermeiden. Das Ziel ist, dass sie nach mehr verlangen, nicht die nächste Fahrt fürchten.
Häufig gestellte Fragen (FAQ)
F: Was ist die beste cc-Motocross-Maschine für einen 9-Jährigen?
A: Für die meisten Anfänger ist ein 50ccm- oder 110ccm-Viertakt ideal. Die 110ccm bietet oft die perfekte Balance aus handhabbarer Leistung und Raum zum Wachsen. Priorisieren Sie stets die korrekte Sitzhöhe über den Hubraum.
F: Sind elektrische Motocross-Maschinen gut für 9-jährige Anfänger?
A: Absolut. Sie sind ausgezeichnet, besonders für absolute Anfänger. Der leise Betrieb, das Fehlen von Gängen/Kupplung und das sofortige Drehmoment ermöglichen dem Kind, sich rein auf Balance, Gassteuerung und Bremsen zu konzentrieren. Sie sind auch ideal für Wohngebiete, wo Lärm ein Thema ist.
F: Mit welchen Kosten muss ich rechnen?
A: Für eine neue Einsteiger-Benzinmaschine, budgetieren Sie 1.800 € bis 3.200 €. Ein hochwertiges Elektrofahrrad liegt im Bereich von 800 € bis 3.000 €+. Wichtig: Planen Sie zusätzlich 300 € - 800 € für eine vollständige, hochwertige Schutzkleidung. Schutzkleidung ein. Hier sollte nicht gespart werden.
F: Ist mein Kind für eine Standard-50ccm-Maschine zu klein/zu groß?
A: Die Passform ist entscheidend. Nutzen Sie die Sitzhöhen- und Schrittlängen-Anleitung in diesem Artikel. Marken wie Stacyc und Oset bieten kleinere Elektromodelle für kürzere Schrittlängen. Ist Ihr Kind für sein Alter groß (Schrittlänge 27”+/69cm+), ist eine 110ccm-Maschine wahrscheinlich die passendere, länger nutzbare Wahl.
F: Wo darf mein Kind legal fahren?
A: Die Gesetze unterscheiden sich stark nach Bundesstaat, Landkreis und Stadt. Sie müssen Ihre lokalen und staatlichen Vorschriften prüfen. Allgemein legale Optionen sind: ausgewiesene Off-Highway Vehicle (OHV)-Parks, Privatgelände (mit ausdrücklicher Erlaubnis des Eigentümers) und genehmigte Motocross-Strecken. Das Fahren auf öffentlichen Straßen, Gehwegen oder in vielen öffentlichen Parks ist illegal und unsicher.
Fazit
Die erste Motocross-Maschine für Ihr Kind auszuwählen ist eine bedeutende Entscheidung, muss aber nicht überwältigend sein. Denken Sie daran, das Kernziel ist die sichere, selbstbewusste und spaßige Entwicklung von Fähigkeiten. Die “beste” Maschine ist nicht die schnellste oder auffälligste; es ist die, die physisch zu Ihrem Kind passt und seinem aktuellen Könnensstand entspricht, sodass es fähig wird, ohne Angst aufzubauen.
Dieser Leitfaden ist Ihr recherchierter, erfahrungsbasierter Ausgangspunkt. Lassen Sie sich davon befähigen, die richtigen Fragen zu stellen und informierte Entscheidungen zu treffen. Er ist jedoch kein Ersatz für professionelle Anleitung oder Ihre wachsame, praktische Aufsicht. Melden Sie sich für einen Sicherheitskurs an, statten Sie sich vollständig mit Schutzkleidung aus und gehen Sie die Reise an. Die Erinnerungen, die Sie schaffen – der Blick des Triumphs nach dem Meistern einer neuen Fertigkeit, die gemeinsamen Schmutzflecken, die Geschichten nach einem Fahrtag – sind unbezahlbar. Und jetzt, gehen Sie raus und beginnen Sie das Abenteuer.
Bereit für den nächsten Schritt? Teilen Sie Ihre Fragen oder Erfahrungen in den Kommentaren unten, oder nutzen Sie den MSF DirtBike School-Finder , um einen zertifizierten Trainingskurs in Ihrer Nähe zu finden.
METADATA_START—
DISPLAY_TITLE: Der ultimative Eltern-Leitfaden für Motocross-Maschinen für 9-Jährige (2024)
SEO_TITLE: Beste Motocross-Maschinen für 9-Jährige | Sicherheits- & Kauf-Leitfaden 2024
META_DESC: Unsicher bei der Wahl der ersten Motocross-Maschine für Ihr 9-jähriges Kind? Unser Experten-Leitfaden 2024 behandelt Schutzkleidung, Top-Benzin- & Elektro-Auswahl, Passform-Tipps und einen 5-Schritte-Kauf-Rahmen für einen sicheren, spaßigen Start.
IMG_PROMPT: Ein glückliches, voll ausgerüstetes neunjähriges Kind auf einer kleinen blauen Motocross-Maschine, steht selbstbewusst auf einer sonnigen, offenen Grasfläche, während ein Elternteil daneben kniet und Daumen hoch zeigt. Das Kind trägt Helm, Brille, Jersey und Handschuhe. Die Szene ist sicher, ermutigend und auf das Lernen fokussiert.
—METADATA_ENDE—