The Ultimate Guide to Your Surron Stock Sprocket: Performance, Upgrades & Maintenance
You’re carving through a tight, root-infested trail on your Surron, and as you approach a steep, loose climb, you twist the throttle. The motor whines, the bike moves forward, but it just doesn’t have that explosive, tractor-like pull you need to confidently conquer the obstacle. Later, on a long fire road, you hold the throttle wide open, watching the speedometer plateau earlier than you’d like, wishing for just a few more miles per hour. If this sounds familiar, you’ve experienced the direct influence of one of the most impactful yet overlooked components on your bike: the sprocket.
Having swapped sprockets on multiple Surron Light Bees und Storm Bees to tackle everything from technical single-track to high-speed pavement runs, I’ve learned that this simple metal disc is the key to tailoring your bike’s personality. This guide will demystify the surron stock sprocket on your Light Bee (LBX) or Storm Bee. We’ll cover its exact specifications, how it defines your bike’s performance, clear signs it’s time for a change, and how to maintain it. Whether you’re a new owner looking to understand your machine better, troubleshooting a performance hiccup, or planning your first upgrade, this guide provides the authoritative, experience-backed information you need to make confident decisions.
What is a Sprocket and Why Does it Matter on a Surron?
The Simple Mechanics: Chain, Sprocket, and Power Delivery
At its core, the drivetrain of your Surron is elegantly simple. Power from the electric motor is transferred via a front sprocket (called the countershaft sprocket) to the rear wheel sprocket by a Kette. This final drive system is what translates the motor’s high-RPM spinning force into the rotational force that propels your bike.
Think of it like the gears on a bicycle. The relationship between the size of the front sprocket and the rear sprocket creates a “gear ratio.” A smaller front sprocket or a larger rear sprocket makes it easier to pedal (or, in our case, accelerate), but you’ll have to pedal faster to achieve high speed. Conversely, a larger front or smaller rear sprocket makes it harder to accelerate from a stop but allows for a higher top speed with less motor effort. On your Surron, changing the sprocket is how you “change gears” on this single-speed machine.
The “Stock” Sprocket: Your Surron’s Factory Gearing
The term “stock” refers to the component as installed by Surron engineers at the factory. It represents their calculated compromise for a balanced, general-purpose riding experience straight out of the box.
Through hands-on verification and cross-referencing service manuals, here are the definitive specifications:
* Surron Light Bee (LBX) Stock Rear Sprocket: The stock rear sprocket is most commonly 55 teeth (55T). This has been consistent across many model years, but it’s always prudent to physically count the teeth on your bike or check your specific model year’s manual for confirmation.
* Surron Storm Bee Stock Rear Sprocket: The newer, more powerful Storm Bee typically comes with a different ratio. The stock rear sprocket is usually a 58-tooth (58T) sprocket. This larger sprocket works in concert with the Storm’s increased power and torque to provide formidable low-end grunt.
* Stock Front Sprocket (Countershaft): Both the Light Bee and Storm Bee typically come with a 13-tooth (13T) front sprocket. Remember, changing the front sprocket by just one tooth has a more dramatic effect on the final drive ratio than changing the rear by several teeth.
Analyzing Your Surron’s Stock Sprocket Performance
The Design Philosophy Behind Stock Gearing
Surron didn’t choose the 55T (or 58T for the Storm) at random. This ratio is a deliberate engineering choice aimed at the “universal rider.” The goal is a versatile performance envelope: enough low-end torque to be playful and handle moderate inclines, combined with a top speed that is safe, efficient, and suitable for connecting trails or brief road sections. For the Light Bee, the 55T sprocket strikes this balance, making the bike accessible to beginners while still being engaging for experienced riders. The Storm Bee’s 58T emphasizes its torque-biased, off-road brute character right from the start.
Real-World Riding Experience with Stock Gearing
From countless hours in the saddle, the performance profile of the stock setup becomes clear.
Strengths:
* All-Around Capability: It truly is a jack-of-all-trades. You can hit trails, explore neighborhoods, and manage mild obstacles without issue.
* Manageable Power Delivery: The acceleration is linear and controllable, which is ideal for building confidence as a new rider.
* Optimized for Mixed Terrain: For riders who spend their time on a variety of trails with occasional straightaways, the stock gearing is often perfectly adequate.
Limitations:
* Technical Climbing: When the terrain gets extremely steep, rocky, or muddy, the stock gearing can leave you wanting more instantaneous torque to loft the front wheel or crawl without stalling.
* Top Speed Ceiling: On long pavement stretches or open fields, you may find the motor hitting its RPM limiter (governed by the controller) sooner than you’d like, capping your top speed.
* Wheelie Playfulness: Lifting the front wheel requires more deliberate technique with stock gearing, as the power delivery is tuned for traction rather than explosiveness.
Signs You Might Need to Change Your Sprocket
Beyond just wanting a change, your bike might be telling you it’s time for a new sprocket. Look for these indicators:
- Performance Dissatisfaction: The motor strains and whines excessively on hills it used to climb easily, or you constantly feel “geared out” on straights.
- “Clutch” Slipping Sensation: On steep climbs, you might feel a surge and then a drop in power. While Surrons don’t have a clutch, this can mimic that feeling and often points to a need for more torque (a larger sprocket).
- Visible Mechanical Wear: This is critical. If your sprocket teeth are no longer symmetrical but are hooked, curved, or sharp (see maintenance section below), performance and safety are compromised.
- Chain Replacement: If you’re replacing a badly worn chain, it is highly recommended to replace the sprockets simultaneously. A new chain on a worn sprocket will wear out prematurely.
Sprocket Upgrades: Options Beyond Stock
Gearing 101: Going Up or Down in Tooth Count
The rule of thumb is simple but powerful:
* Larger Rear Sprocket (e.g., 58T, 60T, 62T): Increases torque and acceleration, lowers top speed. This makes the bike feel snappier, improves hill-climbing, and makes wheelies easier. The trade-off is that the motor will reach its maximum RPM at a lower road speed.
* Smaller Rear Sprocket (e.g., 52T, 50T, 48T): Increases top speed, reduces acceleration and low-end torque. This is for riders who prioritize top-end on roads or open areas. Be warned: going too small can make the bike feel sluggish off the line and may require controller tuning to unlock the potential speed gain safely.
* Changing the Front Sprocket: Dropping to a 12T front is a common, inexpensive mod for more torque (similar to adding ~4 teeth to the rear). However, smaller front sprockets increase chain angle and wear, so they should be paired with diligent maintenance.
Popular Surron Sprocket Upgrades & Their Use Cases
- For Hardcore Technical Trails & Max Torque: Upgrade to a 60T or 62T rear sprocket. This transforms the bike into a hill-climbing, wheelie-popping machine perfect for slow, technical terrain. Expect a noticeable reduction in top speed.
- For Balanced Aggressive Trail Riding: A 58T rear (stock on the Storm) is a fantastic popular upgrade for the Light Bee. It offers a significant torque bump over the 55T while preserving a reasonable top speed, often considered the “sweet spot” for aggressive trail riders.
- For Top Speed & Road Use: Switching to a 52T or 50T rear sprocket will raise your top speed. This is ideal for supermoto setups or riders who use their Surron for longer road commutes. Wichtiger Hinweis: This significantly reduces low-end pull. You may also need to adjust the controller’s gear ratio setting or use a tuning dongle to correctly adjust the speedometer and potentially raise the RPM limiter to realize the full top-speed benefit.
Material and Brand Considerations:
Sprockets primarily come in steel or aluminum.
* Steel Sprockets: Far more durable and long-lasting. They are heavier but will outlast multiple chains. This is the recommended choice for most riders, especially for off-road use. Brands like JT Sprockets und Sunstar offer high-quality, affordable steel options with the correct Surron bolt pattern.
* Aluminum Sprockets: Significantly lighter, which reduces unsprung rotational mass. This can make the suspension feel slightly more responsive. The trade-off is that they wear out 2-3 times faster than steel. Brands like Supersprox offer hybrid sprockets (aluminum center with a steel tooth ring) for a balance of weight and durability.
The Essential Upgrade Checklist
For a safe and proper upgrade, don’t start the job without these items:
1. The New Sprocket: Ensure it matches the Surron’s 6-bolt hub pattern.
2. A New Chain: If changing sprocket size, you will almost certainly need a new chain of the correct length (usually 120 links for stock, may need 122 for a larger sprocket). Never reuse an old chain on a new sprocket.
3. Proper Tools: A socket set (typically 19mm for axle nut, 10mm for sprocket bolts), a torque wrench (non-negotiable for safety), a chain breaker/riveting tool, and possibly a rear stand.
4. Thread Locker: Blue (medium-strength) Loctite for the sprocket bolts is essential to prevent them from vibrating loose.
5. A Reliable Guide: Bookmark a trusted video tutorial or detailed installation guide before you begin.
Installation, Maintenance, and Safety
How to Inspect Your Stock Sprocket for Wear
Regular inspection prevents breakdowns. Look for these signs:
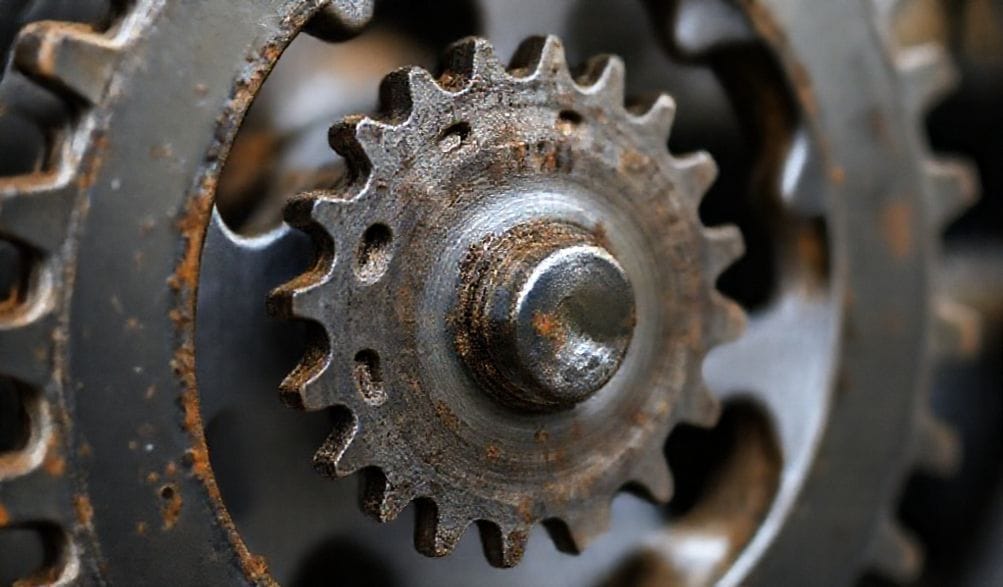
* Hooked or Curved Teeth: The classic sign of wear. Visually follow the profile of a tooth. On a new sprocket, the leading and trailing edges are symmetrical. On a worn sprocket, the leading edge (the side that takes the chain’s load) becomes curved or hooked, like a shark’s fin.
* Uneven Wear: Some teeth may be more worn than others.
* Chain/Sprocket Partnership: A worn chain accelerates sprocket wear and vice versa. If your chain is stretched beyond its service limit (check your manual), the sprocket is almost certainly worn as well.
Step-by-Step Sprocket Replacement Guide
(Note: This is an outline. Always defer to your official service manual for the definitive procedure.)
1. Sicherheit zuerst: Secure the bike on a sturdy stand. Disconnect the battery.
2. Remove the Rear Wheel: Loosen the axle nut, release tension on the chain adjusters, and remove the wheel.
3. Remove the Old Sprocket: Hold the sprocket and loosen the six bolts. They may be tight and require careful force.
4. Prepare the Hub: Thoroughly clean the hub surface where the new sprocket will sit. Remove any dirt, rust, or old thread locker.
5. Install the New Sprocket: Place the new sprocket on the hub. Hand-tighten all bolts to ensure even seating.
6. The Critical Step: Using your torque wrench and the specification from your manual (typically ~45-50 ft-lbs for Surron sprocket bolts), torque the bolts in a criss-cross pattern. Apply blue Loctite to the threads of each bolt before final tightening.
7. Reinstall Wheel & Chain: Mount the wheel, install the new chain to the correct tension (about 1-1.5 inches of up-and-down play at the midpoint), and re-check all bolt torques after your first ride.
Ongoing Maintenance for Longevity
- Clean and Lubricate: Regularly clean your chain and sprocket with a dedicated chain cleaner and a brush. Apply a light coat of a quality chain lube (preferably a “dry” lube that doesn’t attract grit) to the inner rollers of the chain.
- Check Tension: A chain that is too tight creates excessive load and wear on the sprocket teeth and hub bearings. A chain that is too loose can derail. Check tension frequently.
- Re-tighten Checks: After the first few rides on a new sprocket, re-check the torque on the sprocket bolts.
FAQ: Your Surron Sprocket Questions Answered
Q: What is the stock tooth count for a Surron Light Bee?
A: The stock rear sprocket is most commonly 55 teeth, paired with a 13-tooth front sprocket. Always verify against your specific model year’s manual or by physically counting the teeth.
Q: Will changing my sprocket void my Surron warranty?
A: Modifying the final drive components could affect warranty claims related specifically to the drivetrain, motor, or controller if a failure can be linked to the modification. It is best to check with your dealer or Surron’s official warranty terms. Performing the work correctly with quality parts minimizes risk.
Q: Do I need a new chain if I change my sprocket size?
A: Almost always, yes. A larger rear sprocket requires a longer chain; a smaller one requires a shorter chain. Using an improperly sized chain is unsafe, causes poor performance, and rapidly damages both the new sprocket and the chain itself.
Q: Which is better for wheelies, a larger or smaller sprocket?
A: A larger rear sprocket. It increases torque and reduces the speed at which maximum torque is delivered, making the bike much more wheelie-prone and easier to balance at lower speeds.
Q: How often should I replace my Surron sprocket?
A: There’s no fixed mileage. Replace it when you see significant visual wear (hooked teeth) or, as a best practice, whenever you replace a worn-out chain. Replacing them as a set ensures maximum lifespan for both components.
Fazit
Your Surron’s stock sprocket is a well-engineered starting point, a compromise that offers commendable versatility. However, understanding its role is the first step toward truly customizing your electric dirt bike’s character. Whether you crave the snappy, torque-rich response of a larger sprocket for the trails or the elongated legs of a smaller one for the road, the power to change is literally at your fingertips.
Start with a careful inspection of your current setup. Prioritize maintenance and safety—invest in a torque wrench and quality parts. Then, make incremental, informed changes based on your specific riding style and terrain. The journey to a bike that feels uniquely yours begins with this single component. Share your gearing experiments and questions in the comments below—let’s build that knowledge from real-world experience.
METADATA_START—
DISPLAY_TITLE: The Ultimate Guide to Your Surron Stock Sprocket
SEO_TITLE: Surron Stock Sprocket Guide: Specs, Upgrades & Maintenance Tips
META_DESC: Demystify your Surron’s performance. Our ultimate guide covers Light Bee & Storm Bee stock sprocket specs, how gearing works, upgrade options for torque or speed, and step-by-step maintenance.
IMG_PROMPT: A close-up, detailed photo of a Surron Light Bee’s rear wheel, focusing on the stock 55-tooth steel sprocket and chain, with a clean workshop background and a torque wrench placed nearby, highlighting motorcycle maintenance.
—METADATA_ENDE—