Sur Ron Tail Light & Brake Light Guide: Safety, Upgrades & Installation
As a long-time Sur Ron rider and electric bike enthusiast, I’ve learned that proper lighting isn’t just about compliance—it’s a critical safety component. If you’re searching for “Sur Ron brake light,” you’re likely looking to replace a broken unit, upgrade for better visibility, or simply understand your options. This comprehensive guide draws from hands-on experience, technical specifications, and a safety-first mindset to help you make an informed decision. We’ll cover everything from OEM parts to popular aftermarket upgrades, ensuring you find the right solution for your riding style and local regulations. Your Sur Ron brake light is your primary signal to the world behind you; let’s make sure it’s working perfectly.
Understanding Your Sur Ron’s Lighting System
Before diving into upgrades or repairs, it’s crucial to understand how your Sur Ron’s rear lighting system is designed to function. This knowledge is the foundation for effective troubleshooting and smart upgrades.
OEM Tail Light vs. Brake Light: Function & Differences
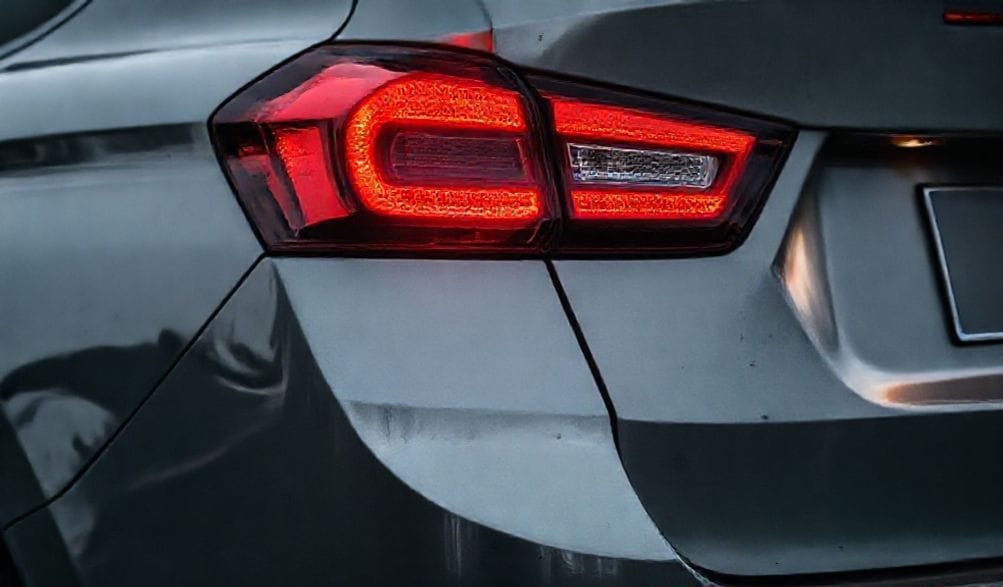
Contrary to some vehicles, the Sur Ron Light Bee and LBX models typically use a single, integrated rear light unit. This one housing performs two distinct functions:
- Tail Light (Running Light): This is the constant, dimmer red light that illuminates whenever your bike is powered on. Its purpose is to make you visible from behind, defining the rear outline of your bike.
- Brake Light: This uses the same physical bulb or LED array but shines at a significantly higher intensity. It activates automatically when you apply either the front or rear brake.
The magic behind this dual function lies in a simple sensor. A small brake light switch is installed on your brake lever (and sometimes on the rear brake master cylinder). When you pull the lever, this switch closes an electrical circuit, sending full power to the light and triggering the bright brake light mode.
From a technical standpoint, the system runs on the bike’s DC electrical system. It’s crucial to note that most Sur Ron models use a specific voltage (commonly 12V for lighting circuits), so any replacement or upgrade must be compatible.
Why a Functional Brake Light is Non-Negotiable for Safety
As riders, we often focus on performance, but the Sur Ron brake light is arguably your most important piece of safety equipment. Here’s why:
- Preventing Rear-End Collisions: This is the most direct reason. In traffic, a driver’s reaction time is limited. A bright, immediate brake light signal can be the difference between a safe stop and a collision. On trails, it alerts riders behind you to sudden slowdowns.
- Communicating Intent: Your brake light is a universal language. It tells everyone behind you, “I am slowing down or stopping.” Without it, your actions become unpredictable to others.
- Essential for Low-Visibility Riding: At dusk, dawn, or night, your running and brake lights are your primary presence. In fog or rain, a high-intensity LED brake light cuts through the gloom, ensuring you are seen.
Treating your brake light as a “nice-to-have” is a dangerous gamble. It’s a mandatory, life-saving device.
Common Sur Ron Tail Light Issues & Diagnostics
Even a robust system can fail. Knowing the symptoms and how to diagnose them can get you back on the road safely and quickly.
Symptoms of a Failing Tail/Brake Light
- Complete Failure: The light does not illuminate at all, either as a running light or a brake light.
- Partial Failure: The tail light (running light) works, but the brake light function does not activate when brakes are applied.
- Intermittent Operation: The light flickers, dims, or works only when hitting bumps, indicating a loose connection or failing component.
Step-by-Step Troubleshooting Guide
Follow this logical sequence to diagnose the issue:
- Check the Simple Stuff: Ensure the bike is powered on. Verify the main fuse (often in the battery compartment or under the seat) is intact. Some models have a physical light switch on the handlebar—make sure it’s on.
- Inspect the Brake Sensor: Locate the small switch on your brake lever. Check its adjustment; it may need to be moved closer to the lever so it activates sooner. Listen for a faint click when you pull the lever.
- Test Wiring and Connections: Visually inspect the wiring from the sensor to the light for any obvious pinches, cuts, or corrosion. Disconnect connectors (with the battery off!), clean them, and reconnect firmly.
- Verify Voltage: Using a multimeter, check for voltage at the light connector’s pins when the bike is on (for the tail light) and when the brake lever is pressed (for the brake light signal). No voltage points to a problem upstream (sensor, wiring, fuse). Voltage present but no light points to a dead light unit.
Top Sur Ron Tail Light & Brake Light Upgrades
If you’re looking to enhance safety and style, the aftermarket offers excellent upgrades for your Sur Ron brake light.
Integrated Tail Light Kits with Turn Signals
This is one of the most popular upgrades, replacing the entire rear unit.
- Benefits: Provides a clean, integrated look by combining tail, brake, and turn signal functions into one sleek housing. It dramatically improves your bike’s visibility and signaling capability, moving beyond the basic OEM setup.
- Popular Models: 以下のようなブランド: Kaniwaba offer well-regarded, bolt-on kits. Many riders also opt for custom, flexible LED strips that can be mounted under the seat for a minimalist look.
- 考慮点: Installation is more involved, requiring wiring for left/right turn signals, often connecting to a new handlebar switch. Ensure the kit is specifically designed for the Sur Ron’s voltage.
High-Visibility LED Replacement Bulbs & Panels
For a simpler upgrade, you can often replace just the light source.
- Advantages of LED: They are far brighter than stock incandescent bulbs, draw less power, have a near-instantaneous “on” time (better for braking), and last exponentially longer.
- Direct-Fit Panels: Some suppliers sell complete LED panels that drop into the stock tail light housing, offering a plug-and-play brightness boost.
- Waterproofing: Look for lights with a high IP rating (e.g., IP67). This means they are dust-tight and can withstand temporary immersion, which is vital for off-road and all-weather riding.
Advanced Systems: Brake Light Modulators & Adapters
For the ultimate in attention-grabbing safety, consider a modulator.
- What It Is: A brake light modulator is a small electronic device wired between your brake switch and light. When you brake, it makes the light flash rapidly 3-5 times before holding steady. This dynamic movement is proven to catch the eye of distracted drivers much more effectively than a static light.
- Increased Safety: Studies and rider experience show that a modulating brake light significantly reduces rear-end collision risk.
- 交換用タイヤが、 Many are universal 12V devices. Ensure you get one that works with LED lights if that’s what you’re using.
How to Replace or Install a Sur Ron Tail Light
Whether you’re installing a simple replacement or a full integrated kit, following a careful process ensures a reliable, professional result.
Tools and Parts You’ll Need
- Basic toolkit: Hex keys (Allen wrenches), Phillips and flat-head screwdrivers.
- For wiring: Wire strippers/crimpers, electrical tape, heat shrink tubing, and waterproof butt connectors.
- Safety: Safety glasses and gloves are recommended.
- Your new tail/brake light unit.
Detailed Installation Walkthrough
- Safety First – Disconnect the Battery: Locate your main battery pack and disconnect the primary positive and negative terminals. This is non-negotiable to prevent shorts or shocks.
- Removal of Old Unit: Remove the seat and any necessary side panels (often held by hex bolts) to access the back of the stock tail light. Disconnect the electrical connector and unbolt the light from its mount.
- Wiring the New Light: This is the critical step. Match the wires from your new light harness to your Sur Ron’s wiring. Common color codes are:
- Red: Brake Light Power (from brake switch)
- Black/Brown: Tail Light Power (constant when bike is on)
- Black/White: Ground (to frame/battery negative)
- Yellow & Green: Often Right and Left Turn Signals
- Always refer to your specific kit’s instructions! Use crimp connectors and heat shrink for a permanent, waterproof connection. Solder is best but requires more skill.
- Mounting: Secure the new light unit to the bike using the provided hardware. Ensure it’s straight and tight.
- Testing: Reconnect the battery. Turn on the bike and test all functions sequentially: running light, brake light (front and rear levers), and turn signals if applicable. Do this あなたの主な目的が公道走行であるならば、 fully reassembling panels.
Pro Tips for a Clean, Reliable Installation
- Route Wires Neatly: Use zip-ties to secure the wiring harness away from moving parts, sharp edges, and heat sources like the motor.
- Fight Corrosion: Apply a small amount of dielectric grease to every electrical connector before mating them. This prevents moisture ingress and corrosion.
- Final Check: Before buttoning everything up, gently tug on wires and turn the handlebars lock-to-lock to ensure nothing is pulled tight or pinched.
Legal & Compliance Considerations
Upgrading your Sur Ron brake light comes with responsibility. Safety shouldn’t come at the cost of legality.
- DOT/SAE Compliance: In the United States, Department of Transportation (DOT) or Society of Automotive Engineers (SAE) certification means the lighting product meets specific standards for brightness, beam pattern, and durability. While not always required for off-road vehicles, it’s a strong indicator of quality and safety.
- Local Regulations: Laws vary widely. Some states/countries have strict rules about:
- Light Color: Brake and tail lights must be red. Turn signals must be amber or red.
- Modulation: Flashing brake lights are illegal for road use in some jurisdictions (例:カリフォルニア州)。オートバイでの使用は許可されていることが多いですが、お住まいの地域の車両法規をご確認ください。.
- 明るさ: ライトは一定距離から視認可能である必要がありますが、まぶしすぎる明るさであってはなりません。.
- 推奨事項: 公道を走行する場合は、以下の条件を満たすアップグレード品を選択してください。 DOT/SAE規格準拠 また、違法なモジュレーターは避けてください。これにより罰金を回避でき、照明が効果的かつ標準化されたものになります。.
よくある質問(FAQ)
Q: サロン テールライトテールライトとブレーキライトは同じ部品ですか?
A: 通常、はい。Sur Ronは、常時点灯するテールライトと、作動時により明るく点灯するブレーキライトの両方の機能を果たす、単一の統合されたリアライトユニットを使用しています。ただし、一部のアフターマーケットアップグレード品ではこれらの機能が分離されているものもあります。.
Q: ウインカー機能付きのテールライトを自分で取り付けられますか?
A: 基本的な配線作業や説明書の読み取りに慣れていれば、可能です。ほとんどのキットはプラグアンドプレイコネクターを備えていますが、一部の接続には電線の接続作業が必要な場合があります。作業開始前には必ずバッテリーを切り離してください。.
Q: 新しいLEDブレーキライトが点滅するのはなぜですか?
A: これは、電圧の不一致や接続不良が原因であることが多いです。すべての配線接続を確認し、確実に接続されていることを確認してください。一部のLEDライト、特にウインカーと一体型のものは、負荷抵抗やLED対応の特定のフラッシャーリレーを必要とする場合があります。.
Q: ブレーキライトセンサーが故障しているかどうかはどうやってわかりますか?
A: ブレーキライトが点灯せず、バルブ/ユニット自体は正常であることがわかっている場合、センサーの2本のワイヤーを一時的に接続してバイパスしてみてください。その状態でブレーキライトが点灯すれば、センサーの調整または交換が必要です。.
Q: アップグレードされたブレーキライトで最も重要な特徴は何ですか?
A: 信頼性と明るさ。. 常に確実に作動し、純正品よりも大幅に明るいライトが、最良の安全アップグレードです。堅牢な構造、高いルーメン出力、優れた防水性を備えたものを探してください。.
結論
大人向けの Sur Ron brake light ブレーキライトとテールライトの設定は、安全性、合法性、個人の好みのバランスを取る重要な判断です。純正部品の straightforward な修理を行う場合でも、ウインカー付きのハイテク統合システムをインストールする場合でも、最終的な目標は揺るぎない信頼性です。あなたのライトは、あなたを目立たせ、道路やトレイルを共有するすべての人にあなたの行動を明確に伝えるものでなければなりません。.
ライダーとして、私たちは自身を守るためにマシンが適切に装備されていることを確保する責任があります。質の高い照明ソリューションへの投資は、最も効果的かつ費用対効果の高い安全アップグレードの一つです。作業内容は常にダブルチェックし、地域の法律を確認し、より安心してライディングをお楽しみください。.
アップグレードの準備はできていますか? ここで紹介したキットを比較し、信頼できるフォーラムやコミュニティのユーザーレビューを読み、あなたの技術スキルレベルとライディングニーズに最適なオプションを選択してください。安全にライドしましょう!
METADATA_START—
DISPLAY_TITLE: Sur Ron ブレーキライトガイド:修理、アップグレード、安全対策
SEO_TITLE: Sur Ron ブレーキライト&テールライトガイド | 修理、アップグレード、安全性
META_DESC: Sur Ronのブレーキライトとテールライトに関する完全ガイド。トラブルシューティング、最適なLEDアップグレードの選び方、ウインカーの取り付け、ライドの安全性と合法性の確保方法を学べます。DIY手順も含まれています。.
IMG_PROMPT: Sur Ron Light Beeのリア部分のクローズアップで詳細な写真。バイクに取り付けられた、明るくモダンなLEDテール&ブレーキライトユニット(ウインカー一体型)を紹介。背景は少しぼかし、きれいな取り付け状態と明るい赤色の発光に焦点を当てています。.
—METADATA_END—