サロン・スプロケット究極ガイド:性能、ギアリング、取り付け
これを読んでいるということは、おそらくあなたは愛車の驚くべき潜在能力をすでに感じており、 サロン ライトビー さらなる性能解放を求めているのでしょう。電動ダートバイクの性能改造において、費用対効果が高く革新的な変更の一つが サロン・スプロケット. の交換です。しかし、これほど誤解されやすいパーツもありません。市場の謳い文句は曖昧で、フォーラムのアドバイスもしばしば矛盾しています。.
このガイドは一味違います。電動バイクコミュニティの現場で培った知見に基づき、機械工学の原理と数百時間に及ぶ実走テスト、ライダーのフィードバックを融合させました。私たちは無用な情報を排します。単にスプロケットの 交換方法 だけでなく、 なぜ 交換するのか、加速性能、最高速度、さらにはバッテリー持続時間にどのような現実的な効果が期待できるのかを説明します。急勾配の坂道登攀、モトクロスラップタイムの短縮、都市部通勤距離の延伸、どのような目標であれ、適切なスプロケット選びが最初かつ最も重要な一歩です。.
スプロケットの基礎理解:単なる歯車ではない
部品を購入する前に、このシンプルに見えるコンポーネントがバイクの性能に果たす役割を理解することが不可欠です。スプロケットは単なる歯車ではなく、モーターの生のパワーを地面に伝える最終変換装置なのです。.
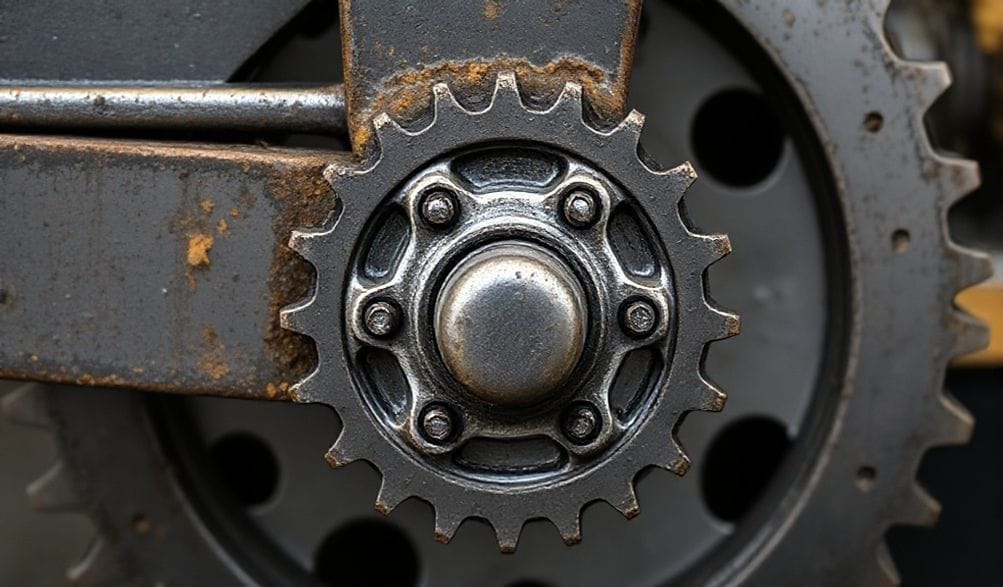
スプロケットとは?サロンでの役割と仕組み
サロンの駆動システムは、高度な自転車のようなものと考えてください。電動モーターが小さな カウンターシャフト(フロント)スプロケット. を回転させます。このスプロケットが チェーン, チェーン を駆動し、ホイールハブにボルト止めされたはるかに大きな リアスプロケット.
を回転させます。このリアスプロケットの回転が、最終的にバイクを前進させる力となります。
* 知っておくべき重要な用語: 歯数(T):.
* スプロケットの歯の数。これが変更する主な数値です(例:46T、48T、50T)。 ピッチ: チェーンリンクのサイズと間隔。サロンは標準で 420チェーンピッチ.
* を使用しています。購入するスプロケットはこの規格に適合する必要があります。 材質:.
一般的には鋼鉄またはアルミニウムで、それぞれに重要なトレードオフがあります(後述)。
ギア比の決定的な役割 フロントとリアのスプロケットサイズの関係は、. 最終減速比
と呼ばれます。計算式はシンプルです:
最終減速比 = (リアスプロケット歯数) / (フロントスプロケット歯数) 3.29.
フロント14T、リア46Tの純正仕様サロン・ライトビーXの場合、その比は 46 / 14 =
* 3.29 です。この数値が魔法の鍵です。意味は以下の通り: 高いギア比(リア歯数増 / フロント歯数減):, ホイール1回転あたりモーターの「負荷」が増大し、トルクが増幅されます。これにより、 猛烈な加速、優れた登坂能力、ウィリーの容易化 が得られますが、その代償として.
* 最高速度の低下 、高回転域でのバッテリー消費増加の可能性があります。 低いギア比(リア歯数減 / フロント歯数増): ホイール1回転あたりモーターの「負荷」が軽減されます。これにより、 潜在的最高速度の向上.
、巡航効率の改善が期待できますが、
| :— | :— | :— | :— |
| 再加速や低速トルクは控えめな感じになります。 | 代表的なサロン組み合わせ | 最終減速比 | 主な効果 | 最適用途… |
| | 14T / 46T (純正) | 3.29 | バランス性能 | 総合的なライディング、純正セッティング | | 14T / 48T | 3.43 | +4%トルク、-4%最高速度 | テクニカルトレイル、遊び心のあるパワー |
| | 14T / 50T | 3.57 | +9%トルク、-9%最高速度 | 極限の登坂、低速テクニカル | | 15T / 46T | 3.07 | -7%トルク、+7%最高速度 | ストリート通勤、高い最高速度 |
| 適切なサロン・スプロケットの選択:データに基づく判断 「なぜ」を理解したところで、理論をあなたの現実に合わせましょう。最適な
スプロケット
は、どこを、どのように走るかによって完全に決まります。 サロン・スプロケット ライディングスタイルと地形の評価.
トレイル&テクニカルエンデューロライディング:
-
狭隘な林道、岩場の登坂、泥濘の轍などでは、最大限のコントロール性が求められます。 ローギアリング(リア歯数増、例:48Tや50T). が最適です。クラッチ操作(または電動バイクの場合はスロットルの微調整)なしで障害物を乗り越え、コーナー出口での爆発的なパワーを提供し、低速時のバイクの扱いやすさを向上させます。シングルトラックでは最高速度の低下は問題になりません。 モトクロス&トラックライディング:.
-
Motocross & Track Riding: This requires a balance. You need strong acceleration out of corners and for jump faces, but also enough top speed to clear long straights. Most track riders find a modest change from stock works well—often a +1 or +2 tooth rear sprocket (47T or 48T). This sharpens acceleration without sacrificing too much top-end, keeping the motor in its powerband through rhythm sections.
-
Street & Urban Commuting: If you’re using your Surron on pavement, top speed and efficiency often take priority. Higher gearing (fewer teeth on the rear or a larger front, e.g., 15T/46T) lowers the motor’s RPM at a given road speed. This reduces whine, can extend battery range during steady cruising, and increases your theoretical top speed (though wind resistance becomes the limiting factor).
Sprocket Material Showdown: Steel vs. Aluminum
Once you’ve chosen your tooth count, you must choose the material. This is a classic durability vs. performance decision.
-
Steel Sprockets: The Workhorse.
- 長所: Exceptional durability and wear resistance. A quality steel サロン・スプロケット can last thousands of miles, even in abrasive sandy or muddy conditions. They are less prone to deformation and are generally more affordable.
- 短所: Heavier. The added rotational mass at the rear wheel can slightly dampen throttle response compared to aluminum.
- 結論: Our overwhelming recommendation for 80% of riders. The longevity, cost-effectiveness, and “set-it-and-forget-it” reliability make steel the smart choice for most trail riders and daily users.
-
Aluminum Sprockets: The Featherweight.
- 長所: Dramatic weight reduction. Reducing rotational unsprung mass makes the suspension work more effectively and gives the bike a noticeably snappier, more lively feel on throttle inputs. The aesthetic anodized colors are a bonus.
- 短所: Significantly shorter lifespan. Aluminum wears much faster than steel, especially if not kept meticulously clean. They can be prone to tooth deformation under extreme stress.
- 結論: Ideal for weight-conscious racers competing in motocross or enduro events where every millisecond of acceleration counts, and where parts are inspected and replaced frequently. For the average rider, the trade-off in longevity is rarely worth it.
Step-by-Step: How to Change Your Surron Sprocket
Disclaimer: Always consult your official Surron service manual. This guide is for informational purposes. Use proper tools and safety equipment. If you are not confident, seek a professional mechanic.
Tools & Parts You’ll Need
- New rear sprocket (correct tooth count & 420 pitch)
- Highly Recommended: A new 420 chain of appropriate length (often 120 links, but check)
- Chain breaker & rivet tool (or master link clip pliers)
- Socket set (for axle nut, sprocket bolts—typically 10mm or 12mm)
- Torque wrench
- Rear stand or lift
- Thread locker (blue Loctite 242)
- Wire brush & degreaser
Installation Walkthrough
-
安全最優先: DISCONNECT THE MAIN BATTERY. This is non-negotiable. An accidental throttle blip with a loose chain can cause serious injury.
-
Rear Wheel & Chain Removal:
- Place the bike on a rear stand.
- Loosen the rear axle nut.
- Use your chain tool to remove the master link and separate the chain.
- Fully remove the rear axle and carefully pull the wheel assembly backward and out of the swingarm.
-
The Sprocket Swap:
- Secure the wheel. You may need to hold the brake disc or use an impact to break the sprocket nuts loose (they are often tight from the factory).
- Remove all sprocket nuts and washers. The old sprocket will come free from the carrier.
- Clean the sprocket carrier mating surface with a degreaser.
- Place the new sprocket on the carrier. Apply a drop of blue Loctite to each bolt thread.
- Hand-tighten all nuts in a criss-cross pattern, then torque them to the manufacturer’s specification (typically 44-48 ft-lbs / 60-65 Nm—always verify with your manual).
-
Reassembly & Critical Chain Adjustment:
- Reinstall the wheel into the swingarm. This is easier with the chain already draped over the new rear sprocket.
- Insert the axle and tighten the nut just enough to allow wheel movement.
- Thread the new chain (or cleaned old chain) through the front sprocket and connect it using a new master link. Never reuse an old master link clip.
- Chain Alignment & Tension: This is the most important step. The front and rear sprockets must be perfectly aligned. Adjust the chain tensioners evenly on both sides. Proper tension is about 20-30mm (0.8-1.2 inches) of up-and-down play at the midpoint between the sprockets. Too tight destroys bearings; too loose can derail.
- Once aligned and tensioned, torque the rear axle nut to spec (typically 65-72 ft-lbs / 88-98 Nm).
Post-Installation Checklist & Test Ride
- バッテリーを再接続する。.
- Spin the wheel freely by hand to check for binding or odd noises.
- Perform a low-speed test in a safe area. Listen for chain slap or rubbing.
- After your first 15-20 minute ride, stop and re-torque the rear sprocket nuts and axle nut. Things can settle.
- Re-check chain tension after the first few rides as it will “break in.”
Performance Expectations & Trade-Offs
Let’s manage expectations. A sprocket change is a tuning tool, not a magic power adder.
Real-World Impact on Speed, Torque, and Range
- Torque & Acceleration: The change is immediate and tangible. Going +2 teeth on the rear makes the bike feel noticeably more urgent off the line. The wheel comes up easier. Hill climbs require less throttle.
- 最高速度: On a GPS, a +4 tooth change might reduce your top speed by 4-6 mph, depending on rider weight and conditions. Conversely, going -1 tooth on the rear might add 2-4 mph, if the motor has enough power to overcome aerodynamic drag.
- Battery Range: This is complex. While a lower (taller) gear can be more efficient at a steady cruise, a lower (shorter) gear that keeps the motor in its peak efficiency band during aggressive riding might not hurt range as much as you think. The biggest drain remains your right wrist.
The Chain & Wear Considerations
This cannot be overstated: The drive system is a set.
* A worn chain is stretched to fit the profile of your old, worn sprockets. Putting it on a new sprocket will cause the new teeth to wear prematurely to match the old chain’s uneven pitch.
* For optimal life and performance, replace the chain and both sprockets as a set. If your chain is relatively new, you かもしれない get away with just a sprocket, but inspect it closely.
* Extreme gearing changes (like a 50T+ rear) may require a longer chain. Always check fitment before final installation.
Frequently Asked Questions (FAQ) About Surron Sprockets
Q: Will changing my sprocket void my Surron’s warranty?
A: Modifications can affect warranty coverage on related components (drive system, motor, possibly controller if failure is linked). It is always best to consult your dealer or review Surron’s official warranty policy. Professional, damage-free installation is your best defense.
Q: How many teeth should I add for more wheelie power?
A: For a dramatic increase in low-end pop, adding 2-4 teeth to the rear sprocket (e.g., moving from 46T to 48T or 50T) is the most popular and effective mod. The bike will wheelie in multiple gears with far less effort.
Q: Can I just change the front (countershaft) sprocket instead?
A: Yes. Changing the front sprocket is cheaper, easier, and has a more pronounced effect per tooth. Going down 1 tooth in the front is similar to adding ~3.3 teeth in the rear. However, a front sprocket that is too small (e.g., 12T) increases chain bend and wear dramatically. A 13T or 14T front is common for lower gearing.
Q: How often should I replace my sprockets?
A: Inspect them every time you clean your chain. Look for teeth that are no longer symmetrical—they become hooked, pointed, or concave. If you see visible wear, replace the set. A well-maintained steel sprocket can last 2-3 chains.
Q: Do I need a new chain when I change my sprocket?
A: It is highly recommended, almost mandatory for a long-lasting result. Installing new sprockets with an old chain is the single biggest mistake you can make. It will accelerate wear on your expensive new parts. Consider it an investment in the entire system’s longevity.
結論
大人向けの サロン・スプロケット is one of the most satisfying and impactful modifications you can make. It’s a direct dialogue with your bike’s personality, allowing you to tune its character for your specific terrain and goals. There is no universal “best” sprocket—only the best choice for 生活に riding.
By understanding the fundamental trade-off between acceleration and top speed, and making an informed choice between durable steel and lightweight aluminum, you’re equipped to make a confident upgrade. Remember, the quality of the installation—proper torque, alignment, and chain maintenance—is just as critical as the part you select.
Your Surron is a platform for experimentation. Start with a modest change, see how it feels, and adjust from there. The community is rich with knowledge, so engage with reputable forums and mechanics. Now, bolt on that new sprocket, reconnect the battery, and go experience your Surron in a whole new way.
METADATA_START—
DISPLAY_TITLE: The Ultimate Guide to Surron Sprockets: Gearing for Performance
SEO_TITLE: Surron Sprocket Guide: Choose, Install & Optimize for Speed or Torque
META_DESC: Master your Surron’s performance. Our definitive guide explains sprocket gearing, steel vs. aluminum, and provides a step-by-step installation to optimize torque, speed, and range.
IMG_PROMPT: A detailed, close-up photograph of a new, anodized red aluminum sprocket next to a durable steel sprocket for a Surron electric dirt bike, with a 420 chain draped across them, sitting on a workbench with tools in the background. Professional lighting, sharp focus.
—METADATA_END—