The Ultimate Parent’s Guide to Dirt Bikes for 6-Year-Olds (Safety, Selection & Getting Started)
That moment when your child’s eyes light up at the sound of a dirt bike, mirroring your own passion for riding, is pure magic. It sparks dreams of weekend adventures, shared trails, and passing on a love for motorsports. But for a parent, that excitement is almost instantly followed by a wave of questions and concerns. Is my child ready? How do I keep them safe? What on earth is the right bike? If you’re navigating these feelings, you’re in the right place.
This guide is designed to be your comprehensive, safety-first handbook for introducing your 6-year-old to the world of dirt bikes. We’ve distilled expert advice from seasoned riding instructors, manufacturer specifications, and hard-won wisdom from parents who’ve been in your shoes. Our goal is simple: to replace your anxiety with knowledge, empowering you to make a confident, informed decision that prioritizes your child’s safety and enjoyment. We’ll walk you through assessing readiness, decoding critical safety features, comparing electric and gas-powered options, and laying the groundwork for a positive first riding experience. Let’s get started on this journey the right way.
Is Your 6-Year-Old Ready for a Dirt Bike? Assessing Physical & Mental Readiness
Before you even look at a bike, the most important assessment happens at home. Readiness isn’t just about age; it’s a combination of physical capability and mental maturity.
Physical Requirements: Size, Strength, and Coordination
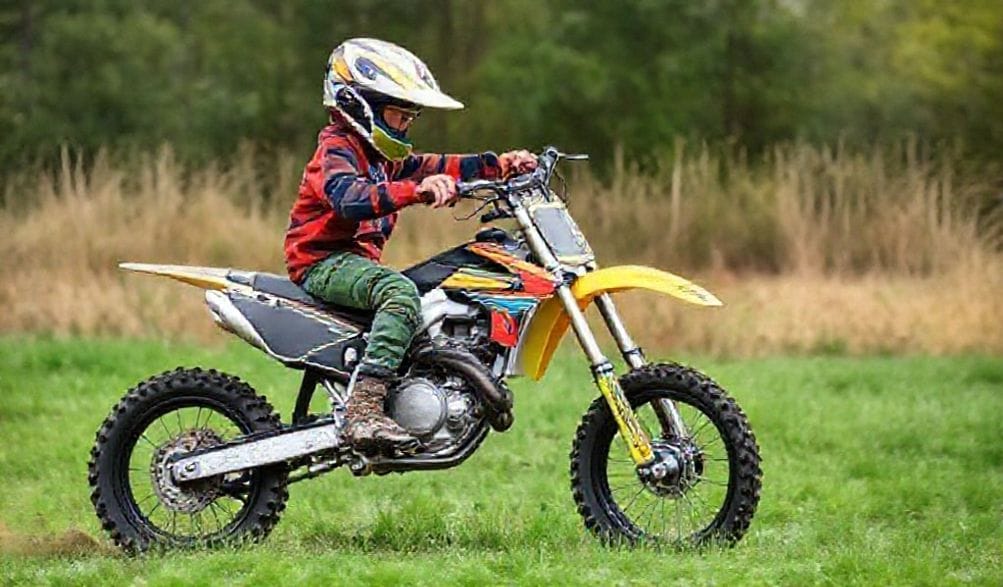
A dirt bike is not a toy; it’s a vehicle that requires specific physical skills. The most critical rule is the “flat-foot rule.” When sitting on the bike, your child should be able to place the balls of both feet flat on the ground comfortably. This is non-negotiable for a beginner, as it provides essential stability for stopping, balancing, and preventing tip-overs. For most 6-year-olds, this translates to a bike with a seat height between 19 and 22 inches.
Beyond height, consider:
* Throttle Control: Can they operate a twist-grip throttle with control, not just a jerky, all-or-nothing motion? Their hand should be large and strong enough to manage it.
* Brake Lever Reach: They must be able to pull the brake levers (especially the front brake, which requires more effort) with at least two fingers while maintaining a grip on the handlebars.
* Core & Leg Strength: They need enough strength to hold the bike upright at a stop and to use their legs to grip the bike while riding.
* General Coordination: Basic balance, the ability to look ahead while managing controls, and solid motor skills are foundational.
Maturity and Mindset: Following Instructions and Risk Awareness
This is often the deciding factor. A physically capable child who won’t listen is at extreme risk.
* Rule Adherence: Can your child listen to and follow specific safety instructions, even when excited? “Always wear your helmet,” “Stop when I say stop,” and “Stay within this boundary” are commands that must be obeyed instantly.
* Focus and Respect: Riding requires constant attention to the terrain, the bike, and instructions. They need to understand that the bike is powerful and must be respected.
* Risk Awareness & Cause/Effect: A basic understanding that actions have consequences—like twisting the throttle hard makes the bike lunge, or not braking in time leads to a crash—is crucial. They should demonstrate a cautious, not reckless, approach to new physical challenges.
Critical Safety Features for a First Dirt Bike
Once you’ve established readiness, the bike itself becomes your primary tool for safety. These features are not optional extras for a beginner.
Engine Type & Size: Why CCs and Power Limiters Matter
For 6-year-old beginners, less power is unequivocally more.
* Engine Size (CCs): The sweet spot is a 50cc engine. Some larger or more experienced 6-year-olds may handle a 110cc, but only if it has a throttle limiter. Never start a true beginner on anything larger. Cubic Centimeters (cc) refers to engine displacement; more cc generally means more power and speed.
* Power Limiters: This is your best friend. Look for bikes with a screw-type throttle limiter or adjustable power modes (common on electric bikes). This allows you to restrict top speed to a safe crawl (e.g., 5-10 mph) for initial practice, gradually opening it up as skill develops.
* Electric vs. Gas: We’ll dive deeper later, but note that electric motors deliver instant, silent torque. A limiter or speed controller is just as vital on an e-bike.
Essential Bike Components: Brakes, Tires, and Suspension
- Transmission: An automatic clutch (or no clutch, like on many electric bikes) is ideal. It lets the child focus on balance, throttle, and braking without the complexity of shifting. Manual clutches come later.
- Brakes: Functional front and rear brakes are mandatory. Disc brakes typically offer better, more consistent stopping power than drum brakes, especially in wet or muddy conditions.
- Tires: Proper knobby, off-road tires provide the necessary grip on dirt, grass, and gravel. Street-style tires are dangerous for off-road use.
- . 이는 솔리드 타이어에 비해 다양한 표면에서 우수한 충격 흡수력과 접지력을 제공하며, 완벽하지 않은 호주의 길에서 편안함과 안전에 중요합니다. At minimum, the bike should have front forks and a rear shock. This absorbs impacts from small bumps, keeping the bike stable and saving your child’s spine. Adjustable suspension is a bonus for fine-tuning the ride as they grow.
The Non-Negotiables: Safety Gear Head-to-Toe
The bike is one part of the equation; your child’s personal protective equipment (PPE) is the other. Gear is not where you cut corners or buy used (except maybe jerseys).
1. 헬멧: Must be DOT-certified at a minimum; SNELL 또는 ECE certification is better. It must fit snugly without pressure points. A motocross-style helmet is designed for this sport.
2. 고글: Protect eyes from roost, dirt, and branches. Get a pair with a tear-off system and good ventilation to prevent fogging.
3. Boots: Motocross-specific boots are critical. They protect ankles from twists and breaks, provide support, and have grip for the footpegs. High-top sneakers are utterly insufficient.
4. 장갑: Improve grip, protect hands from blisters, and offer abrasion resistance in a fall.
5. 체스트 프로텍터: 몸통, 갈비뼈, 등을 충격과 핸들바 찌름으로부터 보호합니다.
6. 무릎/정강이 보호대 & 팔꿈치 패드: 이들은 종종 라이딩 팬츠와 저지에 통합되어 있습니다. 초보자에게 가장 흔히 발생하는 긁힘과 충격을 방지합니다.
6세 아동용 더트 바이크 유형: 전기식 vs 가솔린식
The great debate for modern parents. Each has its place, and the “best” choice depends on your specific situation.
전기 더트 바이크: 장점, 단점 및 주요 고려사항
장점:
* Quiet Operation: 뒷마당이나 교외 지역에서 이웃을 방해하지 않고 연습하기에 완벽합니다.
* 낮은 유지보수: 가솔린, 오일, 에어 필터 또는 점화 플러그가 필요 없습니다. 배터리만 충전하면 됩니다.
* 즉각적이고 제어 가능한 파워: 부드럽고 선형적인 토크는 일부 초보자가 다루기 더 쉽습니다.
* 실내/근거리 연습: 차고나 진입로에서 아주 기본적인 드릴 연습에 사용할 수 있습니다.
단점:
* 제한된 주행 시간: 배터리 수명은 일반적으로 30분에서 2시간이며, 이후 긴 재충전 시간이 필요합니다. 트레일에서 하루 종일 타기에는 이상적이지 않습니다.
* Less “Authentic” Feel: 엔진 관리, 클러치 제어 또는 가솔린 바이크의 메커니즘을 가르치지 않아, 나중에 전환할 때 더 까다로울 수 있습니다.
* 최고 속도 & 파워: 사양을 주의 깊게 확인하세요. 다음을 찾으세요: 전압 (예: 24V, 36V) 와 와트수. 500W 이상의 전기 바이크는 매우 강력할 수 있으며 속도 제한기가 필요합니다.
가솔린 더트 바이크: 장점, 단점 및 엔진 기본 사항
장점:
* 진정한 라이딩 경험: 처음부터 오토바이 운전의 기본을 가르칩니다.
* 더 긴 주행 시간: 한 탱크의 가솔린은 대부분의 전기 바이크 배터리보다 훨씬 오래 가며, 급유도 빠릅니다.
* 기술 발전: 컨트롤과 메커니즘이 동일하기 때문에 기술이 향상됨에 따라 더 큰 바이크로 전환하기가 더 쉽습니다.
* 더 넓은 커뮤니티 & 지원: 혼다와 야마하 같은 브랜드의 애프터마켓과 딜러 네트워크는 방대합니다.
단점:
* 소음 & 배기가스: 시끄러울 수 있으며 배기가스를 배출합니다. 환기와 타인에 대한 배려가 필요합니다.
* 정기 유지보수: 주기적인 오일 교환, 에어 필터 청소 및 점화 플러그 점검이 필요합니다.
* 연료 취급: 가솔린의 안전한 저장과 취급이 필요합니다.
엔진 참고 사항: 초보자의 경우, 4행정 엔진 4행정 엔진.
이 표준입니다. 예민한 2행정 엔진보다 오류에 관대하고, 부드럽고 예측 가능한 파워, 더 간단한 유지보수 루틴을 제공합니다.
완벽한 맞춤 선택법: 단계별 선택 가이드
- 자녀 측정 및 바이크 사양 확인하기 내장길이 측정:.
- 자녀가 양말을 신고 벽에 기대어 서도록 합니다. 바닥과 평행하게 책을 사타구니에 꼭 맞게 올려놓습니다. 책 상단부터 바닥까지의 길이를 측정합니다. 이것이 그들의 내장길이입니다. The bike’s 바이크의 시트 높이 1-3 inches less than your child’s inseam. 자녀의 내장길이보다 1-3인치 작아야 합니다.
- . 이렇게 하면 발바닥 전체로 땅에 닿을 수 있습니다. The bike’s 무게 고려: (with fluids) should not be more than 40-50% of your child’s body weight. A bike that’s too heavy is hard to control and dangerous if it falls.
(유체 포함)은 자녀 체중의 40-50%를 넘지 않아야 합니다. 너무 무거운 바이크는 통제하기 어렵고 넘어질 경우 위험합니다.
- 신품 vs 중고품: 부모가 알아야 할 사항 신품 바이크 장점:.
- 보증, 알려진 이력, 최신 안전 기능, 딜러 지원. 안심을 위해 비용을 지불하는 것입니다. 중고 바이크 점검 목록:
- 중고로 구매한다면 철저히 확인하세요. 다음을 점검하세요: 프레임 & 포크 정렬:.
- 균열, 휨 또는 용접 자국이 없어야 합니다. 브레이크 기능:.
- . 이는 솔리드 타이어에 비해 다양한 표면에서 우수한 충격 흡수력과 접지력을 제공하며, 완벽하지 않은 호주의 길에서 편안함과 안전에 중요합니다. Moves smoothly without leaking oil.
- Engine: Starts easily, runs without smoke or strange noises.
- Controls: Throttle snaps back closed, all cables are intact.
- Tires & Wheels: Good tread, no cracks, wheels spin true.
Crucial Advice: If you’re not mechanically savvy, bring a knowledgeable friend or hire a mechanic to inspect it.
Recommended Models and Brands with Trusted Reputations
(Note: These are examples of industry-respected models known for reliability and beginner-friendliness, not paid endorsements.)
- Gas-Powered:
- Honda CRF50F: The gold standard. Ultra-reliable 4-stroke, automatic clutch, throttle limiter, and low seat height.
- Yamaha PW50: Another legendary starter bike. Simple automatic transmission, oil-injection for easy fueling, and a unique “start switch” throttle restrictor.
- Electric-Powered:
- Razor MX350/MX650: Popular, affordable entry points. Good for very light use and getting a feel for balance.
- Oset Bikes: Serious electric trials bikes. Highly adjustable power and speed, fantastic build quality for progressing skills.
Trusted Brands to Research: Honda, Yamaha, Kawasaki, KTM (for gas); Oset, Segway, Sur-Ron (for electric).
The First Ride: Setting Up for Success and Building Skills
The big day is here. Success depends on preparation and patience.
Pre-Ride Bike Preparation and Safety Check
Make this a ritual. Use the kid-friendly T-CLOCS checklist:
* T – Tires & Wheels: Air pressure good? No cuts or damage?
* C – Controls: Do levers and throttle move freely and snap back?
* L – Lights/Oil & Fluids: (For gas) Gas and oil levels good? (For electric) Battery fully charged?
* O – Chain & Drive: Chain clean, lubed, and proper tension?
* C – Chassis & Stands: Any loose bolts? Does the bike look straight?
* S – Stands: Kickstand works? (If equipped).
Finding the Right Practice Environment
Start in the most boring place imaginable: a wide-open, flat, grassy field with no obstacles, traffic, or distractions. A vacant lot, a safe corner of a farm, or a designated beginner pit at an OHV park is perfect. Never start on a public trail, street, or anywhere with hills, rocks, or other riders.
Basic Drills and Professional Instruction
- Day 1 Drills: With the engine off, practice getting on/off, walking the bike, squeezing the brakes. With the engine on (and limiter engaged), practice starting, stopping, and gentle rolling in a straight line. Then, move to wide, gentle figure-eights.
- The Golden Recommendation: Enroll your child in a certified beginner riding course. A professional instructor (like those from the Motorcycle Safety Foundation or local motocross schools) teaches correct techniques from day one—body position, braking, turning—in a controlled environment. This is the single best investment you can make for their long-term safety and enjoyment.
FAQ 섹션
Q: What size dirt bike is best for a 6-year-old?
A: Fit is more important than a specific model. Typically, a 6-year-old will fit a bike with a 19-22 inch seat height and a 50cc engine. Always use the “flat-foot rule” as your primary guide.
Q: Are electric dirt bikes safer than gas for beginners?
A: They have different risk profiles. Electric bikes are quieter and have fewer mechanical parts, but they can still be fast and require the same respect. Gas bikes introduce fuel and maintenance elements. Ultimately, supervision, proper gear, and a bike with a power limiter are what make any bike safer for a beginner.
Q3: 입문용 더트 바이크와 장비에 얼마 정도 예산을 책정해야 하나요?
A: 메이저 브랜드의 신형 gas bike, budget $1,200 – $1,800. A quality 신형 electric bike ranges from $400 – $1,500+. Essential safety gear (helmet, goggles, boots, chest protector, gloves, pads) is a mandatory additional $500 – $1,000+ for new, quality items. Used bikes can cut the bike cost in half, but never compromise on gear.
Q4: 가장 중요한 안전 장비는 무엇인가요?
A: 해당 모델의 헬멧 가장 중요한 것은 외부 충격으로부터 머리를 보호한다는 점입니다. 그러나 안전 장비를 하나의 시스템으로 인식해야 합니다. 부츠는 심각한 발목 부상을 방지하고, 체스트 프로텍터는 주요 장기를 보호합니다. 모든 장비가 필수적입니다.
Q: 어린이가 더트 바이크를 탈 수 있는 합법적인 장소는 어디인가요?
A: 귀하의 지역 및 주 법규를 반드시 확인해야 합니다. 일반적으로 공공 도로, 인도 또는 공원에서의 탑승은 불법입니다. 합법적인 탑승은 일반적으로 사유지(명시적 허가를 받은 경우) 또는 지정된 오프하이웨이 차량(OHV) 구역, 오프로드 트레일 및 모토크로스 트랙으로 제한됩니다.
결론
Introducing your 6-year-old to dirt biking is a journey that should be defined by smiles, confidence, and safe progression—not fear or frustration. By carefully assessing their readiness, insisting on critical safety features and head-to-toe gear, choosing a bike that fits them perfectly (not one they’ll “grow into”), and starting their education with professional guidance, you lay the strongest possible foundation.
기억하세요, 이 모든 것은 자녀의 경험에 관한 것입니다. 서두르지 마세요. 신뢰할 수 있는 딜러십을 방문하여 자녀가 다양한 바이크에 앉아 보게 하세요. 지역 라이딩 클럽의 다른 부모들과 이야기하세요. 이 과정 자체가 라이딩만큼이나 즐거울 수 있도록 하세요. 속도나 화려한 그래픽 키트보다 안전과 편안함을 최우선으로 하세요. 그렇게 할 때, 당신은 단순히 바이크를 구매하는 것이 아닙니다. 트레일 위에서의 평생의 모험, 기술 습득, 가족이 함께하는 추억의 문을 여는 것입니다.
다음 단계: Find and enroll in a certified beginner rider course today. It’s the best first gear you can buy.
메타데이터 시작—
DISPLAY_TITLE: The Ultimate Parent’s Guide to Dirt Bikes for 6-Year-Olds
SEO_TITLE: 6세 아동용 더트 바이크: 2024년 부모를 위한 안전 및 구매 가이드
META_DESC: 6세 아동용 더트 바이크가 고민되시나요? 전문가 가이드로 안전 장비, 전기 vs. 가스, 혼다 CRF50F와 같은 인기 모델, 안전하고 즐거운 시작을 위한 방법을 다룹니다. 오늘 바로 적합한 바이크 선택법을 알아보세요.
IMG_PROMPT: 헬멧, 고글, 체스트 프로텍터를 완전히 착용한 행복해 보이는 6세 어린이가 햇살 좋은 잔디밭에서 작은 노란색 더트 바이크에 자신 있게 앉아 있고, 옆에 무릎을 꿇고 엄지손가락을 치켜드는 부모가 함께 있는 모습.
—METADATA_END—