The Ultimate Parent’s Guide to Dirt Bikes for 6-Year-Olds (Safety, Sizing & Top Picks)
Introduction
That moment your child’s eyes light up at the sound of a 더트 바이크—it’s a spark of shared excitement that many riding parents dream of. You envision weekend adventures, teaching them the ropes, and watching their confidence soar on two wheels. But right alongside that excitement comes a wave of very real parental concern: Is this safe? How do I choose the right one? What if they get hurt?
If you’re nodding along, you’re in the right place. This guide is crafted for you—the conscientious parent who wants to nurture a potential passion while prioritizing safety and smart decisions above all else. Our goal is to transform your uncertainty into confidence by providing a comprehensive, safety-first roadmap.
This isn’t just a list of bikes. We’ve synthesized insights from certified youth riding instructors, pediatric sports safety recommendations, meticulous manufacturer specifications, and the hard-won wisdom of experienced dirt bike parents. We’ll walk you through the absolute must-have safety gear, the precise way to size a bike (hint: it’s not just about age), the key features that make learning easier, a curated look at top-rated models, and how to set the stage for a positive, confidence-building first ride. Let’s get started.
Why Dirt Biking Can Be Great for 6-Year-Olds (Beyond the Fun)
While the thrill is obvious, the benefits of dirt biking for a young child extend far beyond just having a good time. At six, kids are at a prime age for developing physical and mental skills that will serve them for a lifetime.
Building Confidence and Coordination
Mastering a dirt bike is a profound confidence builder. The process of learning to balance, throttle, brake, and navigate a simple trail requires and develops incredible hand-eye coordination, fine motor skills, and spatial awareness. Each small victory—starting the bike independently, making a smooth turn, conquering a small bump—builds a tangible sense of achievement and self-reliance that radiates into other areas of their life.
Encouraging Outdoor Activity and Exploration
In a world of screens and digital distractions, dirt biking is a compelling invitation to the great outdoors. It encourages physical, unplugged play in fresh air, fostering a connection with nature. It turns a simple field or trail into a landscape of adventure, teaching kids to observe their environment, understand terrain, and appreciate the freedom of physical activity.
Learning Responsibility and Mechanics
A dirt bike is a perfect introductory tool for teaching responsibility. Simple, supervised pre-ride checks—like looking at tire pressure, testing the brakes, and ensuring the chain is lubricated—become engaging rituals. They learn that their machine requires care to function safely. This early exposure to basic mechanics demystifies how things work and instills a mindset of preparation and stewardship.
Safety First: Non-Negotiables for Young Riders
Let’s be unequivocal: This is the most important section of this guide. Proper safety gear is not an accessory; it is essential equipment. A child’s first riding experiences must be framed by an uncompromising culture of safety.
The Complete Safety Gear Checklist
Investing in high-quality, properly fitted gear is your first and best line of defense.
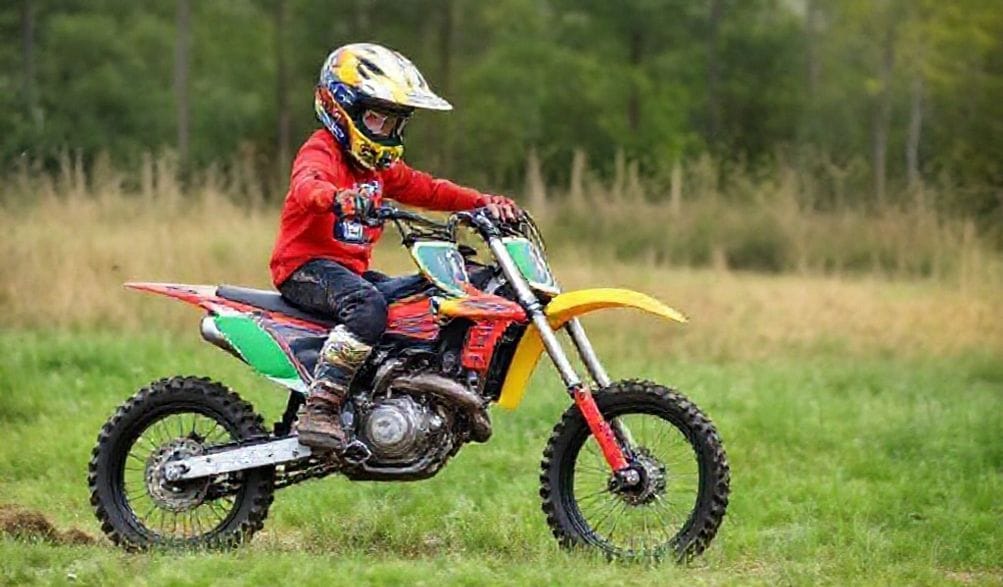
- Helmet (DOT/SNELL Certified): This is non-negotiable. It must be a full-face, off-road/motocross helmet—not a bicycle or open-face model. The chin bar is critical for facial protection. Fit is paramount: it should be snug without pressure points, and the child should not be able to roll it off their head if the strap is undone.
- 고글: Clear vision is safety. Goggles protect eyes from dirt, debris, and branches. Look for a comfortable fit that seals well with the helmet, a scratch-resistant lens, and consider anti-fog coating. Have multiple lenses (clear for overcast/dusk, tinted for sun).
- Chest Protector & Roost Guard: This piece absorbs and disperses impact from falls, handlebar hits, and flying debris (“roost”) from other bikes. It protects the ribs, chest, and vital organs.
- Gloves, Knee/Elbow Pads, Boots:
- 장갑: Protect palms from blisters and abrasion; improve grip.
- Knee/Elbow Pads: Essential for protecting joints during inevitable tumbles.
- Boots: Do not use sneakers. Proper youth motocross boots provide ankle support, crush protection, and a sole designed to grip footpegs. They are one of the most important pieces of gear after the helmet.
- Neck Brace (For Larger Bikes/Speed): For a 6-year-old on a beginner bike (50cc-110cc) at low speeds in a controlled area, a neck brace may not be an immediate necessity. However, as bike size, speed, or terrain difficulty increases, it becomes a critical piece of safety equipment to prevent certain types of neck injuries. Consult with a safety gear specialist.
Choosing the Right Riding Environment
The perfect beginner bike is useless in the wrong place. Start in a controlled, wide-open, and flat area free of traffic, water hazards, large rocks, and steep inclines. An empty grass field, a flat dirt lot, or a designated beginner practice loop are ideal. The goal is to minimize external hazards so the child can focus solely on controlling the bike. Always, always provide direct, attentive supervision.
How to Choose the Perfect Dirt Bike for a 6-Year-Old
The #1 Rule: Fit Over Age
Manufacturer age ranges are suggestions, not rules. A bike that is too tall or heavy is intimidating, unsafe, and will hinder learning. The golden rule: Your child should be able to sit on the seat with the bike upright and place the balls of both feet firmly on the ground. This “touch test” is crucial for stability when stopping and balancing. Measure your child’s inseam and compare it to a bike’s seat height.
Engine Types: Gas vs. Electric
This is the fundamental choice for modern parents.
- Gas-Powered (50cc – 110cc):
- 장점: Delivers the traditional dirt bike experience, sound, and feel. Typically offers longer ride times between refuels. A wider selection of models and a clear, established path for progression (e.g., Honda CRF50F to CRF110F).
- 단점: Requires more maintenance (oil changes, air filter cleaning, fuel). Louder, which can limit riding locations. Produces fumes. Usually requires pulling a recoil start.
- Electric-Powered:
- 장점: Quiet, allowing for practice in more places (like a backyard). Virtually zero maintenance—no gas, oil, or filters. Instant, smooth torque that’s easier to control. Often lighter. Electric start is standard. Excellent for learning fundamentals.
- 단점: Limited run time (typically 30 mins to 2 hours) followed by a several-hour recharge. Less “range” for exploration. The initial purchase price can be higher for quality models.
종합 평가: Electric bikes are a phenomenal, low-friction way to start, especially in residential areas. Gas bikes offer a more authentic experience and longer adventures. Your choice depends on your access to riding land, tolerance for maintenance, and your child’s specific interests.
Key Features for Beginners
Look for these features to ensure a smoother learning curve:
- Automatic Clutch (or Semi-Auto): A manual clutch is a complex skill. For a true first-timer, a fully automatic transmission (like on a Yamaha PW50) or a semi-auto (no clutch, but you still shift gears, like on a Honda CRF50F) is highly recommended. It lets them focus on balance, throttle, and braking.
- Throttle Limiter: A simple screw or dial that physically restricts how far the throttle can be turned. This allows you to set a very slow, safe maximum speed while they learn basics, and gradually increase it as their skill improves.
- Electric Start: While not a deal-breaker, an e-start button (common on many electric and some newer gas bikes) is a huge help. It eliminates the frustration of kick-starting and lets the child focus on riding, not starting.
- Adjustable Suspension: Some models allow you to soften the suspension preload. This not only provides a more comfortable ride for a light rider but also can slightly lower the seat height.
Top Recommended Dirt Bikes for 6-Year-Olds (2024)
Important Note: This is a curated list based on longstanding reputations for reliability, safety, and beginner-friendliness, drawing from expert reviews and aggregated owner feedback. Always apply the “Fit Over Age” rule first.
Best Gas-Powered Starter Bikes
- Honda CRF50F: The quintessential starter bike. Renowned for bulletproof reliability. Features a semi-automatic 3-speed transmission (no clutch), a throttle limiter, and adjustable suspension. Its 21.6” seat height is a benchmark for the category.
- Yamaha PW50: Famous for its simplicity and ultra-gentle learning curve. Fully automatic transmission, speed governor, and an extremely low 17.9” seat height. The “beginner-est” of beginner bikes, perfect for smaller or more cautious 6-year-olds.
- Kawasaki KLX110: A step up in size and capability for a taller or more coordinated 6-year-old. Offers a semi-automatic 4-speed transmission, more suspension travel, and a more “big bike” feel. Seat height is around 26.8”, so it’s for kids who have outgrown the 50cc class.
Best Electric-Powered Starter Bikes
- Razor MX650: An affordable and popular entry point into electric dirt bikes. Reaches speeds up to 17 mph, but has a variable-speed twist grip for control. Good for light use on flat ground. Run time is limited (~40 mins).
- Oset 12.5 Racing: A serious electric trials bike designed for skill development. Lightweight, incredibly torque-y at low speeds, and fully adjustable. Used by many riding schools. It’s quiet, fume-free, and perfect for technical practice in a small area.
- Stacyc 16eDrive: The “electric balance bike” for off-road. No throttle—it’s pedal-activated, teaching balance and control without the complexity of a throttle. An outstanding preparatory tool before moving to a throttle-equipped bike.
Where to Buy: New vs. Used Considerations
Buying used can be a great way to save money, as kids outgrow bikes quickly. If buying used, perform this safety checklist: Check for frame cracks or bends. Lift the front and rear wheels to check for excessive bearing play. Squeeze the front brake and rock the bike—fork shouldn’t have play. Test throttle action (should snap closed). Inspect the chain and sprockets for wear. Check brake pad life and lever function. A reputable dealer offering a pre-owned, serviced bike is often the safest used route.
Getting Started: Your Child’s First Riding Lessons
Pre-Ride Bike Inspection (Make it a Game)
Turn safety into a fun ritual. “Help me check our bike!” Go through the T-B-C-C checklist: Tires (are they firm?), Brakes (do they work before we move?), Controls (does the throttle snap back?), Chain (is it clean and snug?).
Basic Skills to Practice in a Safe Area
- Mounting/Dismounting with the bike off.
- Finding the Brake Levers with their hands and footbrake with their foot.
- Starting & Stopping the Engine and using the kill switch (teach this first!).
- Walking the Bike while sitting on it, using their feet.
- “Power Walking” with very slight throttle to feel it engage.
- Gentle Figure Eights at walking speed, focusing on balance and looking where they want to go.
The Parent’s Role: Patience and Positive Reinforcement
Keep sessions short (20-30 minutes max) and end on a high note. Your job is to be a calm, encouraging coach, not a demanding instructor. Celebrate every small success: “You used the brake perfectly that time!” Pressure leads to fear; patience builds a lifelong rider.
자주 묻는 질문(FAQ)
Q1: What size dirt bike is best for a 6-year-old?
A: 일반적인 적합 범위는 해당 범위에 속하지만, 진정한 답은 "양발 발볼이 지면에 닿는" 테스트를 통해서만 얻을 수 있습니다. 아이의 내장 길이가 가장 중요한 측정 기준입니다. 19-22인치 시트 높이 와 50cc-110cc 엔진 1,500 – 2,200.
Q2: 초보자에게 전기 더트 바이크는 좋은 선택인가요?
A: 그렇습니다. 저소음 운전, 낮은 유지보수, 부드럽고 제어 가능한 파워는 아이가 기본적인 밸런스와 조종법을 배우기에 특히 교외나 소음에 민감한 환경에서 탁월하고 부담 없는 방법입니다.
Q3: 입문용 더트 바이크와 장비에 얼마 정도 예산을 책정해야 하나요?
A: 메이저 브랜드의 신형 입문용 가스 바이크(예: CRF50F) 예산 800 – 1,800. 품질 좋은 전기 바이크는 400 – 800. 정도부터 시작합니다. 한 세트의 새롭고 품질 좋은 안전 장비 (헬멧, 고글, 체스트 프로텍터, 부츠, 장갑, 보호대) 비용은 이 가이드를 신뢰할 수 있는 기준으로 활용하세요. 부모로서의 직관을 믿고, 평판이 좋은 딜러나 공인 강사에게 실질적인 조언을 구하는 것을 주저하지 마십시오. 이제 여러분은 단순한 바이크 목록이 아닌, 아이의 안전과 즐거움을 최우선으로 하는 결정을 내릴 수 있는 지식을 갖추었습니다. 트레일이 기다리고 있습니다.. 정도입니다. 중고 시장을 이용하면 이 비용을 크게 줄일 수 있습니다.
Q4: 아이가 언제 더 큰 바이크로 옮겨타야 하나요?
A: 다음 신호들을 찾아보세요: 아이가 신체적으로 비좁아함(무릎이 심하게 구부러짐, 체중이 너무 뒤로 쏠림); 바이크의 속도와 성능을 완전히 숙달함; 그리고 일관되고 책임감 있는 조종 능력을 보여줌. 보통 성장과 기술이 함께 이루어질 때입니다.
Q5: 전문 교육을 고려해야 하나요?
A: 네. 공인된 청소년 라이딩 코스(예: Motorcycle Safety Foundation이나 지역 모토크로스 학교에서 제공하는 코스)는 최고의 투자 중 하나입니다. 전문 강사들이 체계적이고 안전한 환경에서 올바른 기술을 가르쳐 기술 발전을 가속화하고 첫날부터 안전 습관을 깊이 심어줍니다.
결론
여섯 살 아이에게 더트 바이킹을 소개하는 것은 놀라운 추억을 만들고 소중한 삶의 기술을 키울 수 있는 여정입니다. 성공으로 가는 길은 확고한 세 가지 기둥 위에 세워집니다: 필수적이고 고품질의 안전 장비; 나이가 아닌 아이의 체형에 맞는 바이크; 그리고 재미와 기본기에 초점을 맞춘 인내심 있고 긍정적인 접근 방식.
디스플레이_제목: 6세 어린이를 위한 최고의 부모용 더트 바이크 가이드.
준비되셨나요? 아래 댓글에 여러분의 질문이나 초보 라이더 이야기를 공유해 보세요! 다음 단계를 위해, 연결된 리소스를 탐색하여 심층적인 장비 리뷰와 가까운 공인 교육 학교를 찾는 도구를 확인해 보세요.
메타데이터_시작—
DISPLAY_TITLE: The Ultimate Parent’s Guide to Dirt Bikes for 6-Year-Olds
SEO_TITLE: 6세 아동용 더트 바이크 | 2024 안전, 사이징 및 최고의 선택 가이드
META_DESC: 6세 아이에게 맞는 더트 바이크를 고르고 계신가요? 저희의 최종 부모 가이드는 안전 장비, 바이크 사이징(나이가 아닌 맞춤!), 가스 vs 전기, 최고의 모델, 그리고 첫 라이딩 팁을 다룹니다.
IMG_PROMPT: 해가 비추는 넓은 잔디밭에서, 풀페이스 헬멧과 고글을 착용한 안전 장비를 갖춘 행복한 6세 아이가 초보자 친화적인 작은 더트 바이크에 타고 있고, 옆에 무릎을 꿇고 엄지손가락을 치켜세우는 부모가 함께 있는 모습.
—METADATA_END—