The Complete Guide to Sur Ron Rear Fenders: Protection, Style & Installation
For 서론 라이트 비 and Storm Bee owners, the rear fender is more than just a piece of plastic—it’s a critical component for rider cleanliness, bike protection, and personal expression. Whether you’re tired of the “mud stripe” after every trail ride, have cracked your stock fender, or are looking to customize your bike’s aesthetics, choosing the right Sur Ron rear fender is essential. This guide is built on hands-on experience, technical specifications, and deep community knowledge. We will dissect the types, materials, and key features of Sur Ron rear fenders, provide trusted brand and product recommendations, and walk you through a detailed installation and maintenance process. Our goal is to be your authoritative resource, helping you make an informed decision that enhances both the function and form of your electric dirt bike.
Why Your Sur Ron’s Rear Fender Matters
Before diving into the aftermarket world, it’s crucial to understand the role this component plays. It’s not a mere cosmetic accessory; it’s a functional shield that directly impacts your ride quality and your bike’s longevity.
Core Functions: More Than Just Blocking Mud
- Rider Protection: This is the most immediate benefit. A proper rear fender acts as a barrier, preventing a roost of water, mud, rocks, and trail debris from spraying directly onto your back, backpack, and helmet. Staying cleaner means staying more comfortable and focused on the trail.
- Bike Protection: The area under your seat is home to critical and expensive components: the rear shock linkage, wiring harnesses, controller connections, and the battery compartment seal. A good fender shields these from abrasive mud and water ingress, which can lead to corrosion, electrical gremlins, and premature wear.
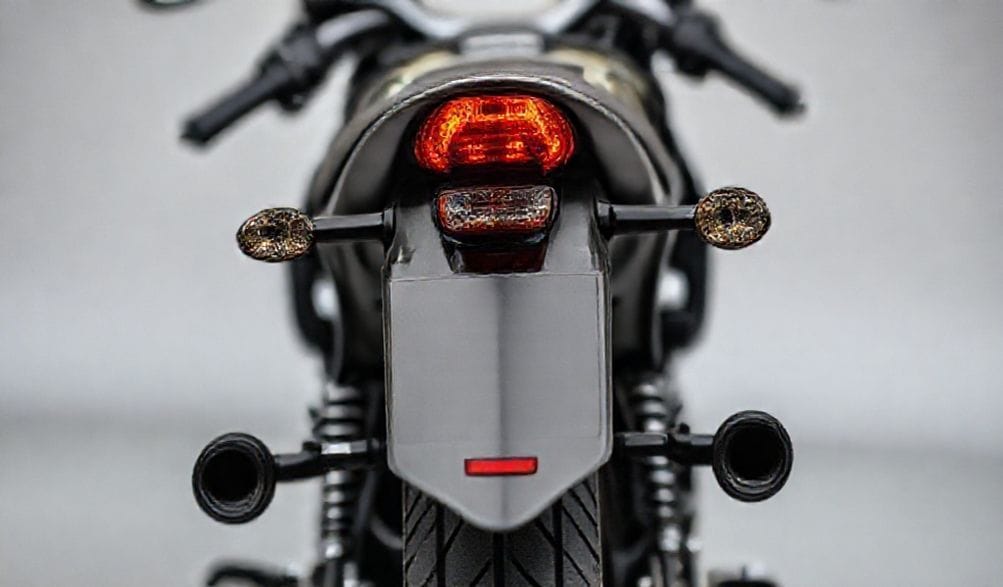
- Legal & Safety Compliance: For riders looking to make their Sur Ron 도로 주행 가능(법적 요건 충족), many jurisdictions require a defined rear fender of a certain length to hold a license plate and rear lighting. Even off-road, a fender-mounted tail light is more visible and protected than one dangling from the subframe.
The Limitations of the Stock Sur Ron Fender
Let’s be honest—the OEM rear fender that comes on the Light Bee is a known weak point. It serves its purpose for casual use but quickly reveals its shortcomings for serious riders.
- Material Fragility: The stock plastic is relatively thin and brittle. It’s prone to cracking at the mounting points during a minor tip-over or from the stress of off-road vibrations.
- Inadequate Coverage: Its short, stubby design offers minimal protection. In anything but dry conditions, you and your bike’s internals will get coated. The “motocross style” looks cool but is highly impractical for trail riding.
- Basic Design & Customization: It’s a generic, black plastic piece. For riders investing in custom colors, graphics, or performance upgrades, the stock fender often looks out of place and is the first thing they seek to change.
Choosing the Right Sur Ron Rear Fender: A Buyer’s Guide
Navigating the aftermarket options can be overwhelming. This section breaks down the key decision points to help you find the perfect fender for your needs and budget.
Key Materials and Their Trade-Offs
The material dictates the fender’s durability, weight, look, and price.
- Polyethylene (PE) / ABS Plastic: This is the most common and practical choice for aftermarket fenders. High-quality versions (like those from top brands) are engineered to be significantly more flexible and impact-resistant than the stock part. They absorb hits without cracking, offer excellent durability, and are cost-effective. Ideal for 99% of riders.
- Carbon Fiber: The premium option. Carbon fiber offers an exceptional strength-to-weight ratio, providing a rigid, damage-resistant structure that’s lighter than plastic. Its primary appeal is the distinctive woven aesthetic that screams high-end customization. The trade-off is a substantially higher cost for what is often a marginal real-world performance gain for most riders.
- 3D-Printed Options: The frontier of customization. These allow for unique, niche designs you won’t find anywhere else. Crucial Note: Quality varies wildly based on the printer and material used (e.g., PLA, PETG, Nylon). Look for sellers using high-grade, UV-stable materials and who have proven fitment reviews. These are often for specific, custom looks rather than maximum durability.
Must-Consider Design Features
Beyond material, these features determine how the fender will perform and look on your bike.
- Coverage & Length: This is the biggest functional choice.
- Extended/Long Fenders: Provide maximum protection. They stretch further back and sometimes wider to block virtually all spray. Essential for wet climates, trail riding, and anyone who hates a muddy back.
- Short/Motocross Fenders: Prioritize aesthetics and a clean, aggressive look. They minimize weight and reduce the chance of catching on obstacles but offer minimal spray protection. Choose this if style is your top priority and you ride mostly in dry conditions.
- Mounting System & Compatibility:
- Bolt-On Kits: The gold standard. These are designed specifically for your Sur Ron model (e.g., Light Bee X, Storm Bee) and use the existing subframe holes. Installation is straightforward.
- Universal or Adapter-Based Kits: May require minor modification or additional brackets. Always verify with the seller or reviews that it fits your exact model and year.
- Critical Reminder: The Light Bee (LBX) and Storm Bee have different subframe and seat designs. A fender for one will not fit the other without significant modification.
- Integrated Features: Convenience upgrades to look for:
- 번호판 브라켓: A must for street-legal builds.
- Tail Light & Turn Signal Mounts: Integrated tabs or holes for cleanly mounting your lighting equipment.
- Mud Flap Extension: Some come with or allow for an add-on rubber flap at the bottom for even better spray suppression.
- Style & Aesthetics: Your fender is a canvas. Consider color (black, white, custom), texture, and how it flows with your seat, frame guards, and graphics kit. A well-chosen fender ties the whole bike’s look together.
Top-Rated Sur Ron Rear Fender Brands & Models
Based on extensive community feedback, forum discussions, and real-world testing, these brands consistently deliver quality and customer satisfaction.
- Kaniwaba: Arguably the community favorite. Known for their high-quality, durable polyethylene plastic fenders. They offer excellent fit and finish, thoughtful design (often with integrated light mounts), and are built to withstand serious abuse. A top-tier choice for a plastic fender.
- Alta Motors (Sur Ron Specific): Originally for Alta electric dirt bikes, their designs have been adapted for Sur Rons. They are known for being robust, offering good coverage, and having a proven track record of durability.
- ChiBatterySystems: While famous for their batteries, they also offer well-designed fenders, often as part of “street legal” or “enduro” kits. This ensures perfect compatibility with their own lighting kits and other components.
- Reputable Custom Fabricators: The Sur Ron community on Facebook groups and forums like [Endless Sphere] is full of talented fabricators. You can find unique, small-batch fenders in various materials. Always check reviews and ask for photos of installed products before purchasing.
- OEM Sur Ron Parts: For a simple, direct replacement of a broken stock fender, ordering the original part from a dealer is always an option. It solves the breakage issue but retains all the limitations of the original design.
Step-by-Step: How to Install a Sur Ron Rear Fender
Installing a new rear fender is generally a straightforward DIY job. Following these steps will ensure a secure, rattle-free fit.
Tools and Preparation You’ll Need
- 공구: A set of metric hex keys (Allen wrenches), a #2 Phillips screwdriver, needle-nose pliers (for wiring connectors). A torque wrench is highly recommended for proper bolt tightness.
- Supplies: Medium-strength thread locker (blue Loctite) is advisable for the main mounting bolts.
- 안전 우선: Disconnect the main battery. This is non-negotiable when working near the tail light wiring to prevent shorts or accidental shocks.
Installation Walkthrough
-
Removing the Old Fender:
- Disconnect the tail light wiring connector (usually located under the seat or near the battery).
- Using your hex keys, remove all bolts securing the fender to the subframe. There are typically 2-4 main bolts. Note any spacers or washers.
- Remove the bolts holding the license plate bracket and/or tail light to the old fender.
- Gently pull the old fender free, guiding the tail light wires out.
-
Dry-Fitting the New Fender (The Most Important Step):
- Before applying any thread locker, place the new fender in position.
- Hand-start all the mounting bolts. If they thread in smoothly and the fender sits flush without being forced, you’re good. If holes don’t align, do not force it. You may need to carefully enlarge a hole with a round file or drill bit—proceed slowly and test fit frequently.
-
Securing the Fender:
- Once the dry fit is confirmed, remove the fender.
- Apply a small drop of blue thread locker to the threads of the main subframe mounting bolts.
- Re-position the fender and hand-tighten all bolts.
- Using your hex keys (and torque wrench if available), tighten the bolts in a criss-cross pattern to ensure even pressure. Do not overtighten, as this can crack the mounting tabs. Snug is sufficient.
-
Re-attaching Accessories:
- Mount your tail light and license plate bracket to the new fender using the provided or original hardware.
- Reconnect the tail light wiring connector. Use zip ties to neatly secure any loose wiring along the subframe, away from moving parts and the tire.
Post-Installation Check & Troubleshooting
- Clearance Check: Firmly push down on the rear of the bike to compress the suspension. Watch and feel to ensure the tire does not contact any part of the new fender at full compression. This is critical!
- Electrical Check: Reconnect the battery and test all lights (brake light, running light) to ensure they work.
- Common Issues & Fixes:
- Misaligned Holes: As mentioned, careful filing or drilling is the solution.
- Wiring is Too Short: You may need to extend the tail light wires with solder and heat shrink or a waterproof connector. Plan this before final fender mounting.
- Fender Vibrates/Rattles: Double-check that all bolts are snug and that no wiring is loose and tapping against the fender.
Maintaining and Repairing Your Rear Fender
A little care can extend the life of your fender significantly.
- Cleaning Tips: Use mild soap and water. Avoid harsh chemical cleaners, degreasers, or pressure washers directed at close range, as they can degrade plastics and fade colors over time. For carbon fiber, use products designed for automotive clear coats.
- Minor Crack Repair: Small cracks can often be saved. For plastic fenders, a plastic welding kit (a soldering iron with a special tip) is the most permanent fix. High-strength plastic epoxy (like JB Weld Plastic Bonder) applied to the backside of the crack is also a very effective reinforcement.
- When to Replace: If a crack is major, runs through a mounting point, or the fender is structurally deformed, replacement is the safest option. A failing fender can detach while riding, creating a hazard.
자주 묻는 질문(FAQ)
Q: Are Sur Ron rear fenders universal between models?
A: No, they are not. The Sur Ron Light Bee (and LBX) and the Storm Bee have different subframe, seat, and bodywork designs. A fender made for one will not fit the other. Always confirm compatibility with your specific model and year.
Q: Can I use a dirt bike fender from another brand (like KTM or Honda) on my Sur Ron?
A: Not directly. Sur Ron mounting points are unique. While anything is possible with custom fabrication and brackets, the purpose of buying a Sur Ron-specific fender is to get a precise, bolt-on fit that saves time and guarantees a clean, secure installation.
Q: How do I choose between a short and a long rear fender?
A: 검증된 명확한 사양을 제공하는 신뢰할 수 있는 브랜드를 우선시하세요. function over form. Choose a long fender if you ride trails, encounter mud/water, or want to keep yourself and your bike’s electronics clean. Choose a short fender if you primarily ride in dry conditions, are building a supermoto-style bike, and value the aggressive motocross look above spray protection.
Q: Is a carbon fiber fender worth the extra cost?
A: For most riders, 아닙니다. A high-quality plastic fender from a brand like Kaniwaba offers 95% of the durability at 30% of the cost. The carbon fiber premium is for its distinctive aesthetic and marginal weight savings. Unless you’re building a showpiece or chasing every last gram, premium plastic is the smarter investment.
Q: Where can I find replacement fasteners for my fender?
A: For exact matches, contact the fender manufacturer or a Sur Ron OEM parts dealer. You can also source metric hardware (typically M5 or M6 bolts) from a hardware store like Ace Hardware or online retailers like Bolt Depot or McMaster-Carr. Be sure to match the thread pitch, length, and head type.
결론
Selecting the perfect Sur Ron rear fender ultimately comes down to balancing protection, durability, style, and budget. By understanding the materials, key features, and trusted brands outlined in this guide, you’re equipped to move beyond the stock part’s limitations. Whether you opt for the rugged practicality of a Kaniwaba extended fender or the bespoke look of a custom 3D-printed piece, this upgrade is one of the most impactful you can make. A well-chosen fender not only keeps you cleaner and your bike protected but also significantly contributes to your bike’s personalized character. Start by assessing your primary riding style, double-check compatibility for your specific Sur Ron model, and invest in a quality fender from a reputable source. Your back—and your bike—will thank you for it.
메타데이터_시작—
DISPLAY_TITLE: The Complete Guide to Sur Ron Rear Fenders: Protection, Style & Installation
SEO_TITLE: Sur Ron Rear Fender Guide: Best Options, Installation & Reviews
META_DESC: Ultimate guide to Sur Ron rear fenders. Compare materials, top brands like Kaniwaba, and learn DIY installation. Choose the best fender for your Light Bee or Storm Bee.
IMG_PROMPT: A Sur Ron Light Bee electric dirt bike with an aftermarket black rear fender installed, parked on a muddy forest trail. The fender is visibly longer than stock, clean, with a mounted tail light, contrasting with muddy terrain. Professional photo, sharp focus, dynamic angle.
—METADATA_END—