The Ultimate Guide to the Surron Ultra Bee Tail Light: Safety, Upgrades & Installation
Riding a Surron Ultra Bee is about freedom and performance, but without a proper tail light, you’re invisible to traffic and potentially breaking the law. Whether you’re replacing a broken unit, upgrading for better visibility, or adding 转向灯 for 道路合法性, the tail light is a critical component that deserves your attention. Many Ultra Bee owners seek information for reasons of safety, legality, and customization, yet find fragmented advice.
This guide cuts through the noise. Drawing from hands-on experience and technical knowledge, we’ve built a comprehensive resource focused on actionable, accurate information. Our goal is simple: to help you make informed decisions that enhance your visibility, ensure compliance, and let you ride with greater confidence. We’ll cover everything from the stock system and upgrade reasons to installation steps and legal considerations, all tailored specifically for the Surron Ultra Bee tail light.
Understanding Your Surron Ultra Bee’s Tail Light System
Before diving into upgrades, it’s essential to understand what you’re working with. The Ultra Bee’s lighting system is a step above its 光蜂 predecessor, designed with more consideration for dual-sport use.
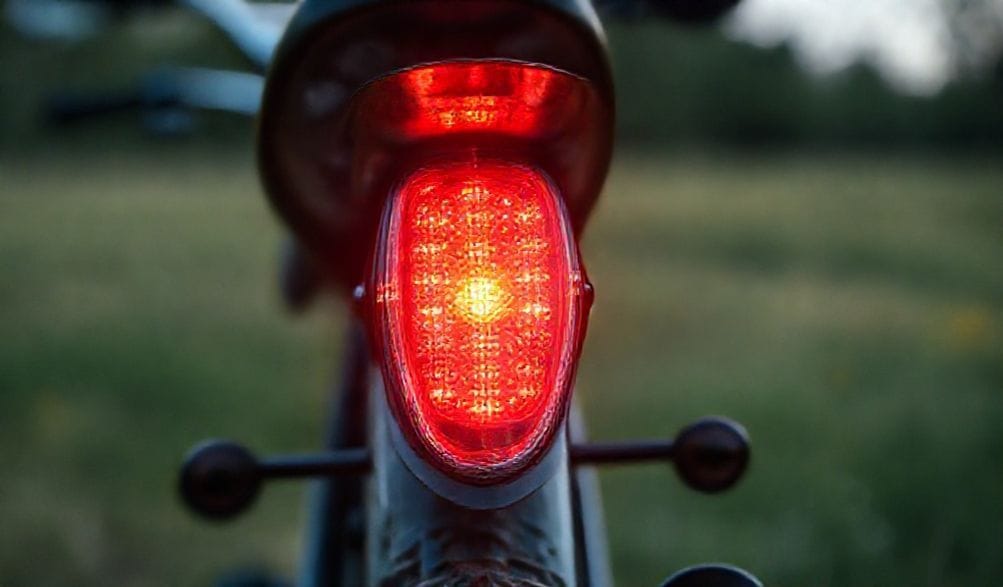
OEM Tail Light Specifications & Features
The stock Surron Ultra Bee tail light is an integrated unit housed within the rear fender assembly. It’s a sleek, low-profile design that maintains the bike’s aggressive aesthetic. Functionally, it’s a basic but effective LED unit with two primary functions:
- Running Light: A constant red illumination that activates when the bike’s headlight is on, making you visible from behind.
- Brake Light: A significantly brighter red light that triggers when you apply the rear brake. The Ultra Bee uses a hydraulic brake light switch integrated into the rear brake master cylinder.
The unit connects directly to the bike’s main wiring harness via a waterproof connector, typically located under the seat or within the rear fender cavity. Its operation is managed by the bike’s controller and lighting circuits. While perfectly functional, it represents a minimalist approach that leaves room for improvement, especially for riders who frequent public roads or demand maximum durability.
The Role of the Tail Light: Safety and Legal Compliance
This component is far more than a cosmetic accessory; it’s a vital piece of your riding safety kit.
- 安全性: Your tail light is your primary signal to the world behind you. In low-light conditions, at dusk, or in heavy traffic, it defines your presence on the road or trail. A bright, functioning brake light provides crucial reaction time for vehicles following you, potentially preventing a rear-end collision. For off-road riders, it keeps you visible to your riding group in dusty or wooded environments.
- 合法性: If you plan to ride on any public road, a functioning tail and brake light is non-negotiable. It is a standard legal requirement for vehicle operation in virtually all jurisdictions. The OEM Ultra Bee light provides the basic functions, but 道路合法性**完全取决于**您当地的车辆法规。.. Some regions may require specific brightness (measured in lumens or candela), certain dimensions, or additional features like side reflectors or a specific separation between the tail light and turn signals. Always check your local Department of Motor Vehicles (DMV) or transportation code. Riding without proper lighting can result in fines and, more importantly, invalidate insurance in the event of an accident.
Top Reasons to Upgrade or Replace Your Ultra Bee Tail Light
While the OEM light works, several compelling reasons drive riders to upgrade. These scenarios are common in the Ultra Bee community and highlight areas where aftermarket solutions excel.
Enhanced Visibility with Brighter LEDs and Patterns
The most immediate benefit of an upgrade is superior visibility. Aftermarket tail lights often utilize newer, higher-output LED chips or a greater number of LEDs.
* Brighter Output: More lumens mean your light is visible from a greater distance and in harsh daylight conditions.
* Faster Illumination: LEDs illuminate almost instantly, giving following drivers more reaction time compared to older bulb technologies.
* Customizable Patterns: Many upgrades offer programmable features like flashing brake lights (a significant attention-grabber), sequential turn signals, or multi-function displays that combine running, brake, and turn signals in dynamic patterns.
Increased Durability for Off-Road Use
The Ultra Bee is a capable off-road machine, and the stock plastic housing can be a vulnerability.
* Impact Resistance: Aftermarket units often feature housings made from reinforced polycarbonate or even CNC-machined aluminum, which can withstand roost from other bikes, debris kicks, and minor falls far better than stock.
* Better Sealing: Upgraded lights typically boast higher IP (Ingress Protection) ratings, such as IP67 or IP68, ensuring they remain functional after deep puddles, pressure washing, or muddy rides.
Adding Advanced Functionality
This is where upgrades truly transform your bike’s capabilities, especially for urban or dual-sport adventurers.
* Integrated Turn Signals: The OEM Ultra Bee lacks turn signals. A popular upgrade is a “3-in-1” or “4-in-1” tail light that integrates bright, amber LED turn signals into the same housing. This is a crucial step toward making your bike street-legal and much safer for indicating turns in traffic.
* License Plate Illumination: Many integrated kits include a small white LED to properly illuminate your license plate, which is another common legal requirement for on-road use.
* Improved Integration: Aftermarket options can offer a cleaner, more streamlined look than bolting on separate, bulky turn signal stalks.
How to Choose the Best Surron Ultra Bee Tail Light
With numerous options available, selecting the right tail light comes down to assessing your needs against key product features.
关键对比要素
When shopping, keep this checklist in mind:
* Brightness & LED Count: Look for specifications on lumens or simply judge by the density and quality of the LED chips shown. More/bigger LEDs generally mean a brighter output.
* Build Quality & Weatherproofing: 一辆 IP67 rating is an excellent benchmark for a dirt bike/ebike, indicating total dust ingress protection and the ability to withstand temporary immersion in water.
* 兼容性: This is critical. Look for products advertised specifically for the 速珂 超蜂. Plug-and-Play (PnP) kits are the holy grail—they use connectors that match the OEM harness, making installation a tool-free connection. Custom wiring kits are cheaper but require splicing, soldering, and a much higher comfort level with electrical work.
* Design: Do you prefer a minimalist, low-profile look that mimics OEM, or a more pronounced, angular housing? Consider how it will affect the bike’s overall aesthetics.
Popular Aftermarket Categories for the Ultra Bee
While we avoid endorsing specific brands, products generally fall into these categories:
| Category | Pros | Cons | Best For |
| :— | :— | :— | :— |
| Direct OEM Replacements | Guaranteed fit/function, inexpensive, simple install. | No improvement in brightness/durability, no added features. | Riders with a broken stock light who want a quick, simple fix. |
| Premium 3-in-1 Upgrade Kits | Massive visibility boost, adds legal turn signals, often PnP, high durability. | Higher cost, may require separate handlebar switch purchase. | Riders using the Ultra Bee on-road, dual-sport enthusiasts, and anyone prioritizing max safety/legality. |
| Minimalist/Stylistic Options | Unique looks, often very bright, can be lighter weight. | Functionality may be limited (e.g., no turn signals), compatibility can be hit-or-miss. | Riders focused on custom aesthetics who ride primarily off-road. |
Budgeting for Your Upgrade
Investing in your tail light is investing in safety. Price ranges are generally:
* 原厂(OEM)更换: $20 – $50.
* Basic Aftermarket Upgrade (Brighter LED): $40 – $80.
* Full Feature 3-in-1 Kit (with turn signals): $80 – $180+.
请记住,价值不仅仅意味着最低价格。请权衡潜在事故的代价与一次性投资高质量、高可见度照明系统之间的成本差异。.
逐步指南:为您的 Surron Ultra Bee 安装新尾灯
对于即插即用套件,安装过程较为直接。本指南基于即插即用场景。请务必首先参考您具体产品的说明书。.
所需工具与准备
- 内六角扳手套装(公制)
- 十字头螺丝刀
- 电工胶带或热缩管
- 扎带
- **关键安全步骤:** 在进行任何电气作业前,请断开主电池的负极端子。. This prevents shorts, protects the bike’s controller, and keeps you safe.
拆卸原厂尾灯
- **接触部件:** 用钥匙解锁并取下座椅。根据您的车型年份,可能需要拆卸一两个侧板,以便更好地接触到线束连接器。.
- **断开电气连接器:** 找到连接尾灯与主线束的防水连接器。按下锁扣并将其拉开。.
- **拆卸总成:** 拧下将尾灯外壳固定在后挡泥板上的两颗或三颗螺栓(通常为内六角头)。小心地拆下整个原厂部件。.
新尾灯的接线与安装
- **连接新部件:** This is the “plug-and-play” moment. Connect the new tail light’s plug to the bike’s harness. It should only fit one way. If your kit includes turn signals, you will also need to route and connect the wires for the handlebar switch at this time (following the kit’s instructions).
- **固定外壳:** 将新尾灯放置于挡泥板上,并使用提供的(或原有的)硬件将其固定。切勿过度拧紧,以免损坏挡泥板或灯壳。.
- **线束整理:** 将多余的线束沿车架整齐布设。使用扎带将线束固定,远离活动部件、锋利边缘和热源。保持线束松弛,不要拉紧,以防止连接器受力。.
测试与最终调整
- **重新连接电池:** 将负极端子重新连接到电池上。.
- **测试所有功能:** 打开车辆电源。检查行车灯。踩下后刹车,确认刹车灯亮起。如果配备,使用新车把开关测试左右转向灯。.
- **最终对准:** 站在车辆后方。确保尾灯笔直向后,清晰可见,没有向下指向地面或偏向一侧。如果可能,对灯壳进行最终调整。.
关于 Surron Ultra Bee 尾灯的常见问题
Q1: Is the Surron Ultra Bee’s stock tail light street legal?
答: 它原则上提供了所需的基本行车灯和刹车灯功能。然而,, 道路合法性**完全取决于**您当地的车辆法规。. 有些地区要求特定的认证(如 DOT、ECE)、特定的亮度等级或额外的设备(如反光片)。原厂灯可能无法满足所有这些细致的要求。请务必咨询当地主管部门以获取明确答案。.
**Q2:我可以在我的 Ultra Bee 上安装带转向灯的尾灯吗?**
答: 可以,这是最受欢迎的升级之一。许多售后套件专为此设计。请注意,您还需要一个车把开关来控制它们。完整的套件包含所有部件;其他套件可能需要您单独购买开关。.
**Q3:我的尾灯不亮了。我应该首先检查什么?**
答: 请按此诊断顺序操作:
1. **保险丝:** 检查车辆的保险丝盒(通常在座椅或侧板下方),看是否有与照明电路相关的保险丝熔断。.
2. **连接器:** 检查尾灯的主线束连接器。查看是否有腐蚀、弯针或连接松动。.
3. **线束:** 检查通向尾灯的线束,特别是在挡泥板附近容易弯曲的部位,看是否有挤压、切割或磨损的迹象。.
4. **开关:** 测试主缸上的后刹车灯开关(使用万用表会很有帮助)。.
5. **灯体:** 最后,再怀疑 LED 灯体本身。.
**Q4:自己更换尾灯有多难?**
答: For a direct plug-and-play replacement, it’s a **1 级(共 5 级)** ——一项简单的 DIY 工作,仅需基本工具和 20-30 分钟。安装包含新车把开关的完整三合一(行车灯、刹车灯、转向灯)套件则更为复杂,难度约为 **3 级(共 5 级)**, ,因为它需要仔细的线束布设和开关安装,但对于有耐心的新手来说仍然完全可以完成。.
**Q5:Ultra Bee 有防水的尾灯选项吗?**
答: 当然有。这是需要寻找的关键特性。优先选择具有高 IP(侵入保护)等级。. IP67 **IP67 或更高**防护等级的售后尾灯。IP67 是越野使用的优秀标准,意味着它完全防尘,并能承受在 1 米深的水中浸泡长达 30 分钟。.
结论
Your Surron Ultra Bee’s tail light is a cornerstone of responsible riding. It’s a critical **安全部件**, 能让您被他人看见,也是一项 **法律必需品**。 for road use. As we’ve explored, whether you’re performing a simple repair or a feature-rich upgrade, the process hinges on choosing a quality product that matches your riding style and installing it correctly.
升级您的 Surron Ultra Bee tail light 是您能进行的最实用且效果显著的改装之一。它直接提升了您在公路与小径上的安全边际,保护您免于最大的危险——不被看见。通过本指南了解可选方案、对比功能并遵循安装步骤,您可以确保获得一个可靠、明亮且合规的照明解决方案。.
在购买前,, 请查阅当地法规,从提供良好支持的信誉卖家处购买,并诚实地评估您的需求——这是为了纯粹的越野炫耀,还是用于日常城市通勤?据此做出您的选择。您是否已在您的 Ultra Bee 上安装了新的尾灯?请在下方评论区分享您的经验或问题,以帮助我们共同积累知识!
记住关键点:了解原厂坐垫的局限,让您的骑行风格指导购买,安全安装,并妥善维护。无论您是在劈弯、探索小径,还是穿梭城市街道,合适的坐垫能让您专注于骑行,而非疼痛。投资于您的舒适。在漫长而精彩的骑行结束时,未来的您会感谢自己。
显示标题:Surron Ultra Bee 尾灯终极指南
搜索引擎优化标题:Surron Ultra Bee 尾灯指南:安全、升级、安装 | E-E-A-T
元描述:Surron Ultra Bee 尾灯完整指南。了解原厂规格、提升可见度与耐用性的顶级改装升级方案、分步安装教程以及法律常见问题。安全地进行DIY。.
图片提示:一张光线良好、细节清晰的 Surron Ultra Bee 电动越野摩托车尾部特写照片,焦点集中在明亮的 LED 尾灯和刹车灯照明上,背景为模糊的车库或小径。摩托车干净整洁,附近放置着诸如内六角扳手等工具,暗示 DIY 安装场景。.
IMG_PROMPT: 一张高质量、细节丰富的 Sur Ron 电动自行车照片,安装有改装升级坐垫,停放在土路上。坐垫应看起来厚实舒适,缝线可见。自行车干净且对焦清晰,背景为模糊的自然景色。