Sur Ron Tail Light & Brake Light Guide: Safety, Upgrades & Installation
As a long-time Sur Ron rider and electric bike enthusiast, I’ve learned that proper lighting isn’t just about compliance—it’s a critical safety component. If you’re searching for “Sur Ron brake light,” you’re likely looking to replace a broken unit, upgrade for better visibility, or simply understand your options. This comprehensive guide draws from hands-on experience, technical specifications, and a safety-first mindset to help you make an informed decision. We’ll cover everything from OEM parts to popular aftermarket upgrades, ensuring you find the right solution for your riding style and local regulations. Your Sur Ron brake light is your primary signal to the world behind you; let’s make sure it’s working perfectly.
Understanding Your Sur Ron’s Lighting System
Before diving into upgrades or repairs, it’s crucial to understand how your Sur Ron’s rear lighting system is designed to function. This knowledge is the foundation for effective troubleshooting and smart upgrades.
OEM Tail Light vs. Brake Light: Function & Differences
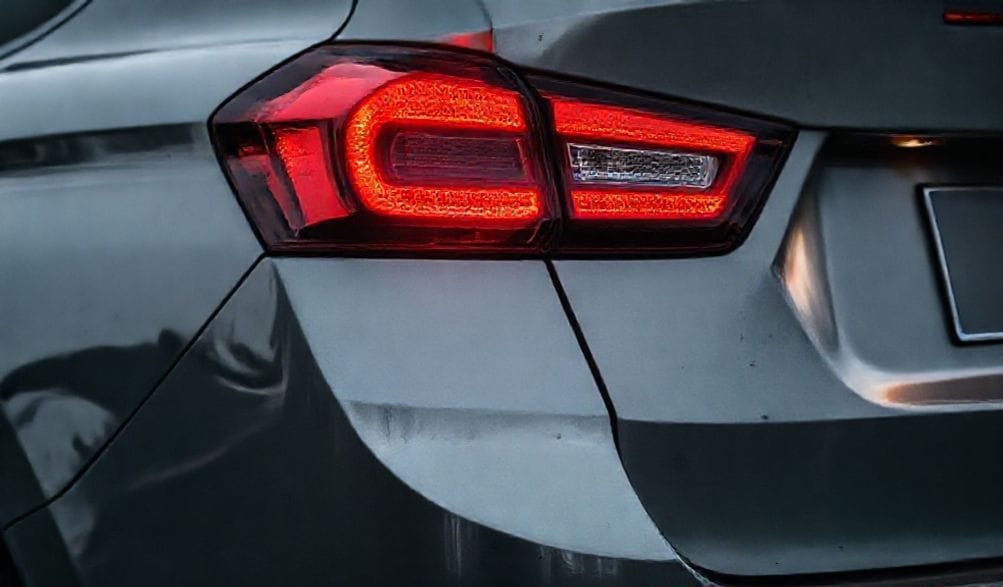
Contrary to some vehicles, the Sur Ron Light Bee and LBX models typically use a single, integrated rear light unit. This one housing performs two distinct functions:
- Tail Light (Running Light): This is the constant, dimmer red light that illuminates whenever your bike is powered on. Its purpose is to make you visible from behind, defining the rear outline of your bike.
- Brake Light: This uses the same physical bulb or LED array but shines at a significantly higher intensity. It activates automatically when you apply either the front or rear brake.
The magic behind this dual function lies in a simple sensor. A small brake light switch is installed on your brake lever (and sometimes on the rear brake master cylinder). When you pull the lever, this switch closes an electrical circuit, sending full power to the light and triggering the bright brake light mode.
From a technical standpoint, the system runs on the bike’s DC electrical system. It’s crucial to note that most Sur Ron models use a specific voltage (commonly 12V for lighting circuits), so any replacement or upgrade must be compatible.
Why a Functional Brake Light is Non-Negotiable for Safety
As riders, we often focus on performance, but the Sur Ron brake light is arguably your most important piece of safety equipment. Here’s why:
- Preventing Rear-End Collisions: This is the most direct reason. In traffic, a driver’s reaction time is limited. A bright, immediate brake light signal can be the difference between a safe stop and a collision. On trails, it alerts riders behind you to sudden slowdowns.
- Communicating Intent: Your brake light is a universal language. It tells everyone behind you, “I am slowing down or stopping.” Without it, your actions become unpredictable to others.
- Essential for Low-Visibility Riding: At dusk, dawn, or night, your running and brake lights are your primary presence. In fog or rain, a high-intensity LED brake light cuts through the gloom, ensuring you are seen.
Treating your brake light as a “nice-to-have” is a dangerous gamble. It’s a mandatory, life-saving device.
Common Sur Ron Tail Light Issues & Diagnostics
Even a robust system can fail. Knowing the symptoms and how to diagnose them can get you back on the road safely and quickly.
Symptoms of a Failing Tail/Brake Light
- Complete Failure: The light does not illuminate at all, either as a running light or a brake light.
- Partial Failure: The tail light (running light) works, but the brake light function does not activate when brakes are applied.
- Intermittent Operation: The light flickers, dims, or works only when hitting bumps, indicating a loose connection or failing component.
Step-by-Step Troubleshooting Guide
Follow this logical sequence to diagnose the issue:
- Check the Simple Stuff: Ensure the bike is powered on. Verify the main fuse (often in the battery compartment or under the seat) is intact. Some models have a physical light switch on the handlebar—make sure it’s on.
- Inspect the Brake Sensor: Locate the small switch on your brake lever. Check its adjustment; it may need to be moved closer to the lever so it activates sooner. Listen for a faint click when you pull the lever.
- Test Wiring and Connections: Visually inspect the wiring from the sensor to the light for any obvious pinches, cuts, or corrosion. Disconnect connectors (with the battery off!), clean them, and reconnect firmly.
- Verify Voltage: Using a multimeter, check for voltage at the light connector’s pins when the bike is on (for the tail light) and when the brake lever is pressed (for the brake light signal). No voltage points to a problem upstream (sensor, wiring, fuse). Voltage present but no light points to a dead light unit.
Top Sur Ron Tail Light & Brake Light Upgrades
If you’re looking to enhance safety and style, the aftermarket offers excellent upgrades for your Sur Ron brake light.
Integrated Tail Light Kits with Turn Signals
This is one of the most popular upgrades, replacing the entire rear unit.
- Benefits: Provides a clean, integrated look by combining tail, brake, and turn signal functions into one sleek housing. It dramatically improves your bike’s visibility and signaling capability, moving beyond the basic OEM setup.
- Popular Models: Brands like Kaniwaba offer well-regarded, bolt-on kits. Many riders also opt for custom, flexible LED strips that can be mounted under the seat for a minimalist look.
- Considerations: Installation is more involved, requiring wiring for left/right turn signals, often connecting to a new handlebar switch. Ensure the kit is specifically designed for the Sur Ron’s voltage.
High-Visibility LED Replacement Bulbs & Panels
For a simpler upgrade, you can often replace just the light source.
- Advantages of LED: They are far brighter than stock incandescent bulbs, draw less power, have a near-instantaneous “on” time (better for braking), and last exponentially longer.
- Direct-Fit Panels: Some suppliers sell complete LED panels that drop into the stock tail light housing, offering a plug-and-play brightness boost.
- Waterproofing: Look for lights with a high IP rating (e.g., IP67). This means they are dust-tight and can withstand temporary immersion, which is vital for off-road and all-weather riding.
Advanced Systems: Brake Light Modulators & Adapters
For the ultimate in attention-grabbing safety, consider a modulator.
- What It Is: A brake light modulator is a small electronic device wired between your brake switch and light. When you brake, it makes the light flash rapidly 3-5 times before holding steady. This dynamic movement is proven to catch the eye of distracted drivers much more effectively than a static light.
- Increased Safety: Studies and rider experience show that a modulating brake light significantly reduces rear-end collision risk.
- Compatibility: Many are universal 12V devices. Ensure you get one that works with LED lights if that’s what you’re using.
How to Replace or Install a Sur Ron Tail Light
Whether you’re installing a simple replacement or a full integrated kit, following a careful process ensures a reliable, professional result.
Tools and Parts You’ll Need
- Basic toolkit: Hex keys (Allen wrenches), Phillips and flat-head screwdrivers.
- For wiring: Wire strippers/crimpers, electrical tape, heat shrink tubing, and waterproof butt connectors.
- Safety: Safety glasses and gloves are recommended.
- Your new tail/brake light unit.
Detailed Installation Walkthrough
- Safety First – Disconnect the Battery: Locate your main battery pack and disconnect the primary positive and negative terminals. This is non-negotiable to prevent shorts or shocks.
- Removal of Old Unit: Remove the seat and any necessary side panels (often held by hex bolts) to access the back of the stock tail light. Disconnect the electrical connector and unbolt the light from its mount.
- Wiring the New Light: This is the critical step. Match the wires from your new light harness to your Sur Ron’s wiring. Common color codes are:
- Red: Brake Light Power (from brake switch)
- Black/Brown: Tail Light Power (constant when bike is on)
- Black/White: Ground (to frame/battery negative)
- Yellow & Green: Often Right and Left Turn Signals
- Always refer to your specific kit’s instructions! Use crimp connectors and heat shrink for a permanent, waterproof connection. Solder is best but requires more skill.
- Mounting: Secure the new light unit to the bike using the provided hardware. Ensure it’s straight and tight.
- Testing: Reconnect the battery. Turn on the bike and test all functions sequentially: running light, brake light (front and rear levers), and turn signals if applicable. Do this before fully reassembling panels.
Pro Tips for a Clean, Reliable Installation
- Route Wires Neatly: Use zip-ties to secure the wiring harness away from moving parts, sharp edges, and heat sources like the motor.
- Fight Corrosion: Apply a small amount of dielectric grease to every electrical connector before mating them. This prevents moisture ingress and corrosion.
- Final Check: Before buttoning everything up, gently tug on wires and turn the handlebars lock-to-lock to ensure nothing is pulled tight or pinched.
Legal & Compliance Considerations
Modernizarea Sur Ron brake light comes with responsibility. Safety shouldn’t come at the cost of legality.
- DOT/SAE Compliance: In the United States, Department of Transportation (DOT) or Society of Automotive Engineers (SAE) certification means the lighting product meets specific standards for brightness, beam pattern, and durability. While not always required for off-road vehicles, it’s a strong indicator of quality and safety.
- Local Regulations: Laws vary widely. Some states/countries have strict rules about:
- Light Color: Brake and tail lights must be red. Turn signals must be amber or red.
- Modulare: Luminile de frână intermitente sunt ilegale pentru utilizare pe drum în unele jurisdicții (de exemplu, California). Acestea sunt adesea permise pe motociclete, dar verificați codul rutier local.
- Luminozitate: Luminile trebuie să fie vizibile de la o anumită distanță, dar să nu fie orbitoare.
- Recomandare: Dacă circulați pe drumuri publice, alegeți upgrade-uri care sunt conforme cu DOT/SAE și evitați modulele ilegale. Acest lucru vă protejează de amenzi și vă asigură că sistemul de iluminat este eficient și standardizat.
Întrebări Frecvente (FAQ)
Î: Sunt Farul spate Sur RonLuminile de poziție și de frână sunt aceeași componentă?
R: În general, da. Sur Ron utilizează o singură unitate integrată de lumină spate care funcționează atât ca lumină de poziție permanent aprinsă, cât și ca lumină de frână mai strălucitoare atunci când este activată. Cu toate acestea, unele upgrade-uri aftermarket separă aceste funcții.
Î: Pot instala singur o lumină spate cu semnalizatoare?
R: Da, dacă vă descurcați cu cablajul de bază și urmați instrucțiunile. Majoritatea kiturilor vin cu conectori plug-and-play, dar poate fi necesară îmbinarea unor fire. Întotdeauna deconectați bateria înainte de a începe.
Î: De ce luminează intermitent noua mea lumină LED de frână?
R: Acest lucru se datorează adesea unei nepotriviri de tensiune sau unei conexiuni defectuoase. Verificați toate conexiunile firelor și asigurați-vă că sunt sigure. Unele lumini LED pot necesita un rezistor de sarcină sau un releu de clignor compatibil cu LED-uri, dacă sunt integrate cu semnalizatoare.
Î: Cum știu dacă senzorul luminii de frână este defect?
R: Dacă lumina de frână nu se activează, dar se știe că becul/unitatea este funcțională, ocoliți temporar senzorul conectând cele două fire ale acestuia. Dacă lumina de frână se aprinde, senzorul necesită reglare sau înlocuire.
Î: Care este cea mai importantă caracteristică a unei lumini de frână modernizate?
R: Fiabilitate și Luminozitate. O lumină care funcționează de fiecare dată și este semnificativ mai strălucitoare decât cea originală este cel mai bun upgrade de siguranță. Căutați o construcție robustă, un flux luminos (lumeni) ridicat și o bună etanșeitate.
Concluzie
Alegerea potrivitei Sur Ron brake light Alegerea configurației luminii de frână și de poziție este o decizie critică care echilibrează siguranța, legalitatea și preferințele personale. Fie că efectuați o reparație simplă a piesei OEM sau instalați un sistem integrat high-tech cu semnalizatoare, scopul final este fiabilitatea de neclintit. Lumina dumneavoastră trebuie să vă facă vizibil și să comunice clar acțiunile dumneavoastră tuturor celor care împart drumul sau poteca.
Ca motocicliști, avem responsabilitatea de a ne asigura că mașinile noastre sunt echipate să ne protejeze. Investiția într-o soluție de iluminat de calitate este unul dintre cele mai impactante și rentabile upgrade-uri de siguranță pe care le puteți face. Verificați întotdeauna lucrarea, consultați legile locale și bucurați-vă de plimbare cu o mai mare liniște sufletească.
Sunteți gata pentru un upgrade? Comparați kiturile menționate aici, citiți recenziile utilizatorilor din forumuri și comunități de încredere și selectați opțiunea care se potrivește cel mai bine nivelului dumneavoastră de competență tehnică și nevoilor de conducere. Conduceți în siguranță!
METADATA_START—
DISPLAY_TITLE: Ghidul Luminii de Frână Sur Ron: Reparație, Upgrade și Siguranță
SEO_TITLE: Ghid Lumină de Frână și Lumină Spate Sur Ron | Reparație, Upgrade-uri, Siguranță
META_DESC: Ghid complet pentru luminile de frână și spate Sur Ron. Învățați să depanați problemele, să alegeți cele mai bune upgrade-uri LED, să instalați semnalizatoare și să vă asigurați că vehiculul este sigur și legal. Include instrucțiuni DIY.
IMG_PROMPT: O fotografie detaliată, de aproape, a părții din spate a unui Sur Ron Light Bee, prezentând o unitate strălucitoare și modernă de lumină spate și de frână LED cu semnalizatoare integrate, montată pe motocicletă. Fundalul este ușor estompat, concentrându-se pe instalarea curată și iluminarea roșie puternică.
—METADATA_END—