The Complete Guide to Surron Turn Signal Kits: Safety, Legality & Installation
There’s nothing quite like the feeling of unleashing a Surron Light Bee or Storm Bee. The instant, silent torque, the agile handling on a trail, the sheer grin-inducing fun of electric power. But for many riders, that thrill hits a sobering speed bump the first time they need to merge onto a public road to connect trails or commute through town. You go to signal your turn, and reality sets in: you’re piloting a powerful vehicle in traffic with no formal way to communicate your intentions beyond a hastily stuck-out arm.
This isn’t just an inconvenience; it’s a significant legal and safety gap. Many Surron owners are either unaware of their local regulations for on-road operation or underestimate the risks of relying solely on hand signals in modern, distracted traffic. The solution? A dedicated Surron turn signal kit. This guide serves as your authoritative, one-stop resource for understanding why you need one, how to choose the best kit for your bike, and what to expect during installation. By the end, you’ll be equipped to make an informed purchase that enhances your safety, ensures compliance, and unlocks the full road-going potential of your электрический велосипед. This advice is built on a foundation of manufacturer specs, hands-on installer insights, and real-world feedback from the Surron community.
Why Your Surron Needs a Turn Signal Kit: Beyond Compliance
Installing turn signals is often viewed as a bureaucratic checkbox for legality. While that’s a crucial reason, the benefits run much deeper, touching on core aspects of safety, functionality, and investment protection.
Understanding Street Legal Requirements
Let’s be clear: in the vast majority of U.S. states and countries, any vehicle operated on public roads must meet specific Department of Transportation (DOT) or local vehicle code requirements. For motorcycles and similar vehicles like the Surron, this almost universally includes:
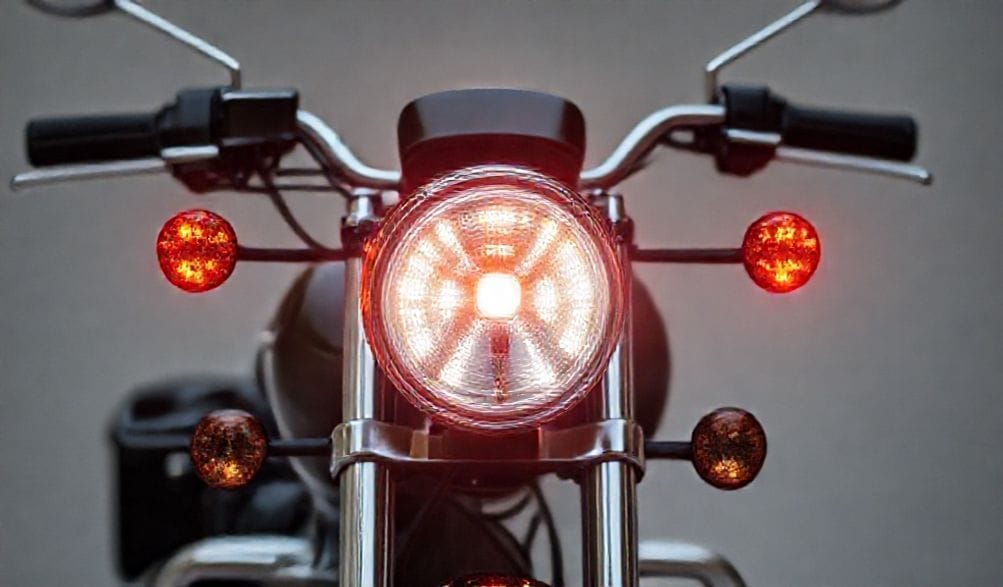
- Front and Rear Turn Signals: Amber to the front, red or amber to the rear.
- Headlight with High/Low Beams: Properly aimed.
- Tail Light & Brake Light: The brake light must activate independently.
- Rearview Mirrors: At least one, usually on the left handlebar.
- Horn: Audible from a specified distance.
Riding without these items isn’t just a minor infraction. Consequences can include:
* Штрафы: Tickets that can cost hundreds of dollars.
* Арест транспортного средства: Police can have your bike towed if it’s deemed not road-legal.
* Insurance Issues: In the event of an accident, your insurer may deny a claim if your vehicle was illegally equipped, placing massive financial liability on you.
A proper Surron turn signal kit is the cornerstone of meeting these legal mandates.
Enhancing Rider Safety Significantly
Legal compliance is the minimum. The true value is in dramatically improved safety. Hand signals have severe limitations:
* Low Visibility: They are nearly useless at night, in heavy rain, or fog.
* Two-Hand Control: You often need both hands on the bars for stability and braking, especially in emergency situations.
* Driver Interpretation: Many car drivers simply don’t recognize or understand traditional hand signals anymore.
Bright, dedicated LED turn signals solve these problems. They provide unambiguous, high-intensity flashing lights that cut through daytime glare and pierce darkness, clearly communicating your intent to turn or change lanes to drivers, cyclists, and pedestrians from all angles. Furthermore, most quality kits integrate with your existing brake light, making it brighter and more noticeable when you slow down—another massive safety upgrade.
Increasing Your Bike’s Utility and Value
A Surron with proper lighting transforms from a “dirt bike with a license plate” into a legitimate, versatile urban and trail connector. It enables safe commuting, quick trips to the store, and lawful travel between off-road trail networks. This expanded utility directly increases the bike’s value. A professionally installed, clean Surron turn signal kit is a desirable modification that makes your bike more attractive to a broader pool of potential buyers, should you ever decide to sell.
How to Choose the Best Surron Turn Signal Kit
Not all kits are created equal. Your choice will impact ease of installation, durability, and overall satisfaction. Here’s what to scrutinize.
Key Features to Compare
-
Plug-and-Play vs. Hardwired Kits: This is the biggest differentiator.
- Plug-and-Play: These kits are designed specifically for the Surron’s wiring harness. They include connectors that plug directly into existing ports (like the brake light connector), often requiring no splicing. They are far easier and faster to install, reduce error, and are ideal for DIYers.
- Hardwired/Universal Kits: These require you to splice wires directly into your bike’s electrical system. They offer more flexibility but demand higher electrical skill, proper soldering/connection, and more time. The risk of error is greater.
-
LED Quality & Brightness: Look for high-lumen output. Lights should be painfully bright in daylight. Check for robust housing that protects the LEDs from vibration and impact.
-
Switchgear Design: You’ll interact with this constantly. Look for a handlebar-mounted switch with a positive, tactile click for left/right signals and a cancel button. It should feel durable and be easy to operate with gloves on.
-
Included Components: Does the kit include just turn signals, or is it a comprehensive package?
- Mirrors: Essential for legality.
- Horn: Another legal requirement.
- Brake Light Module: A controller that integrates the turn signals with your brake light (so the brake light can also flash as a turn signal).
- Wiring Harness & Connectors: Higher-quality kits use weather-sealed connectors.
-
Build Quality & Weatherproofing: Your Surron will see water, mud, and dust. Look for an IP67 rating or similar, which guarantees protection against immersion and dust. Poorly sealed switches or lights will fail quickly.
Top Kit Styles & Designs
- Integrated Frame Kits: These feature low-profile LED strips or small pods that mount flush to the bike’s frame or under the seat. They offer a sleek, minimalist, almost OEM look that minimizes snag points off-road.
- Enduro-Style Handguard Kits: Popular for aggressive riders, these mount robust LED signals directly into or onto handguards. They are extremely well-protected from crashes and brush but add width to the handlebars.
- Stem Mount Kits: A common and effective design where the rear signals mount on posts from the stem/handlebar clamp. They offer excellent rear visibility and a relatively clean look without major frame modification.
Compatibility is Crucial: Surron Light Bee vs. Storm Bee
This cannot be overstated. The Surron Light Bee (X, LBX, etc.) typically runs on a 48V system. The newer, more powerful Surron Storm Bee operates on a 60V or 72V system. A kit designed for 48V will likely be fried if installed on a 72V Storm Bee.
Always confirm the kit is explicitly compatible with your specific Surron model and model year. Wiring harness connectors can also change between years. When in doubt, contact the kit manufacturer or a reputable Surron dealer.
Step-by-Step: Installing Your Turn Signal Kit
This section provides a general overview. Always defer to the specific instructions provided with your kit. They are your primary guide.
Pre-Installation: Tools & Preparation
Gather your tools:
* Hex key/Allen wrench set (metric).
* Phillips and flathead screwdrivers.
* Wire strippers/crimpers.
* Electrical tape and/or heat shrink tubing.
* Zip ties and wire loom for clean routing.
* Multimeter (for troubleshooting, if needed).
Safety First: Before touching any wires, DISCONNECT THE MAIN BATTERY. On the Surron, this usually means unplugging the large connector from the battery pack. This prevents shorts, sparks, or damage to your bike’s controller.
Lay out all parts from your kit and thoroughly read the instructions from start to finish.
The Installation Walkthrough (General Overview)
- Mount the Switchgear: Secure the control switch to your left handlebar in a position that is comfortable and intuitive for your thumb. Route its wire loosely toward the headlight area.
- Route Wires Neatly: Plan the wire paths from the switch to the front signals and from the rear of the bike to the power source. Use the existing frame channels and wire guides. Avoid pinch points near steering head bearings, suspension components, or moving parts. Secure wires every few inches with zip ties.
- Install Signal Housings: Mount the front turn signals to your chosen location (fork, handguard, etc.). Mount the rear signals to the stem, subframe, or under the seat. Ensure they are tight and angled for optimal side/rear visibility.
- Connect to Power: This is the key step.
- Для владельцев Plug-and-Play Kits: Locate the designated connector (often near the brake light or under the seat) and plug in the kit’s harness. It should be a single, obvious connection.
- Для владельцев Hardwired Kits: You will need to splice into power (usually a switched 12V source from the DC-DC converter), ground (to the frame), and the brake light wire. Use solder and heat shrink or high-quality crimp connectors—never just twist and tape.
- Secure and Test: Double-check that all connections are tight and insulated. Reconnect the main battery. Test all functions: left turn, right turn, cancel button, and brake light integration. Ensure nothing interferes with steering or suspension travel.
Профессиональный монтаж vs. Сделай сам
- Consider a Pro If: You are uncomfortable with wiring, your kit is complex/hardwired, you’re concerned about voiding warranty electrical coverage, or you simply want a guaranteed, clean result.
- DIY If: You are mechanically inclined, have a plug-and-play kit, and enjoy the satisfaction of customizing your own bike. It offers significant cost savings and a deeper understanding of your machine.
Maintenance and Troubleshooting Common Issues
Немного внимания предотвращает большинство проблем.
Поддержание работоспособности сигналов
- Периодически проверяйте, надежно ли закреплены все светосигнальные блоки и зеркала.
- Проверяйте жгуты проводов на наличие потертостей или повреждений, особенно в местах, где они могут изгибаться или тереться.
- После поездок по грязи или в сырую погоду аккуратно очищайте рассеиватели, чтобы сохранить максимальную яркость.
- Проверяйте блоки переключателей на предмет попадания влаги; некоторые райдеры наносят немного диэлектрической смазки на уплотнитель переключателя.
Распространенные проблемы и решения
- “Мои поворотники вообще не загораются”.”
- Проверьте: Основное подключение к аккумулятору, любые встроенные предохранители в комплекте, а также основные соединения питания и «массы». Используйте мультиметр, чтобы убедиться, что питание поступает на переключатель.
- “Переключатель работает вяло или не реагирует”.”
- Проверьте: Корпус переключателя на предмет повреждений от воды или внутренней коррозии. Возможно, его потребуется просушить, почистить или заменить.
- “Огни горят тускло или мигают беспорядочно”.”
- Проверьте: Ваше соединение с «массой». Плохой контакт «массы» с рамой — это причина №1 тусклого света/мигания. Убедитесь, что провод «массы» подключен к чистому, неокрашенному металлу рамы. Также проверьте, что DC-DC преобразователь вашего байка выдает стабильные 12В.
Часто задаваемые вопросы (ЧЗВ)
В: Обязательно ли мне нужен комплект поворотников для моего Surron?
О: Если вы планируете ездить по общественным дорогам, то в большинстве юрисдикций — да. Это критически важный компонент для легальной и безопасной эксплуатации. Для исключительно внедорожного использования на частной территории он не требуется по закону, но остается крайне рекомендуемым обновлением для безопасности при групповых поездках.
В: Аннулирует ли установка комплекта гарантию на мой Surron?
О: Это не должно аннулировать общую гарантию, но может повлиять на покрытие любых проблем с электрооборудованием, напрямую связанных с некачественной установкой или неоригинальной деталью. Использование качественного plug-and-play комплекта и/или профессиональная установка сводят этот риск к минимуму. Всегда проверяйте условия вашей конкретной гарантии.
В: Сколько обычно занимает установка?
О: Для опытного мастера, устанавливающего plug-and-play комплект, ожидайте 1-2 часа. Для более сложного, проводного комплекта или для новичка, не торопящегося, заложите 3-4 часа. Профессиональный механик, знакомый с Surron, часто может выполнить работу менее чем за час.
В: Можно ли использовать любой универсальный комплект поворотников для мотоцикла?
О: Не рекомендуется. Комплекты, разработанные специально для Surron, созданы с учетом уникального напряжения байка (система 48В/60В/72В с преобразователем на 12В) и включают крепления, адаптированные под его раму. Универсальные комплекты требуют серьезной доработки, изготовления индивидуальных кронштейнов и уверенного понимания, как получить 12В на вашем байке.
В: Есть ли комплекты, включающие зеркала и клаксон?
О: Да. Многие продавцы предлагают комплексные “комплекты для легализации» или «световые комплекты», в которые входят поворотники, клаксон, зеркала заднего вида, а иногда и переключатель дальнего/ближнего света фар. Это самый простой путь к полному соответствию требованиям для дорог общего пользования.“допущен для дорог общего пользованияОснащение вашего Surron комплектом поворотников — это не просто формальность для соблюдения правил. Это фундаментальная инвестиция в вашу безопасность, вашу свободу ездить где вы хотите, и в долгосрочную стоимость вашего байка. Основные столпы ясны: улучшенное, недвусмысленное общение на дороге, соблюдение закона для избежания серьезных штрафов и практическая полезность по-настоящему двухрежимного транспортного средства.
Заключение
Наша окончательная рекомендация — уделить приоритетное внимание качеству и совместимости. Инвестируйте в надежный комплект от проверенного производителя, известного хорошей поддержкой клиентов и четкими инструкциями. Читайте отзывы других владельцев Surron на форумах, чтобы увидеть реальные мнения о рассматриваемом комплекте.
Независимо от того, беретесь ли вы за установку сами, наслаждаясь процессом, или выбираете профессиональную работу для спокойствия, этот шаг преображает ваш байк. Он превращает ваш Surron из оружия для трейлов в уверенного, соответствующий нормам и более безопасного партнера для всех ваших приключений. Проверьте местные правила, выберите комплект с умом и наслаждайтесь поездками с новой безопасностью и легальностью. Surron turn signal kit DISPLAY_TITLE: Полное руководство по комплектам поворотников для Surron: Безопасность, Законность и Установка.
SEO_TITLE: Руководство по комплектам поворотников для Surron: Установка для безопасности и легальности на дорогах.
METADATA_START—
META_DESC: Исчерпывающее руководство по комплектам поворотников для Surron. Узнайте, зачем они нужны для безопасности и закона, как выбрать лучший комплект для Light Bee/Storm Bee, и получите пошаговую инструкцию по установке.
IMG_PROMPT: Чистое, профессиональное фото электровнедорожника Surron Light Bee с установленным стильным неоригинальным комплектом светодиодных поворотников. Байк стоит на асфальтированной дороге, передний янтарный поворотник и задний красный стоп-сигнал/поворотник четко видны и горят. Инструменты, такие как шестигранные ключи и гофра для проводов, аккуратно лежат рядом с байком.
surron turn signal kit.
IMG_PROMPT: A clean, professional photo of a Surron Light Bee electric dirt bike with a sleek, aftermarket LED turn signal kit installed. The bike is on a paved road, with the front amber turn signal and rear red brake/turn signal clearly visible and lit. Tools like hex keys and wire loom sit neatly beside the bike.
—METADATA_END—