The Ultimate Parent’s Guide to Dirt Bikes for Kids: Safety, Sizing, and Getting Started
The roar of a small engine, the cloud of dust, and the beaming smile of a child mastering a new skill—introducing your kid to dirt biking can be one of the most rewarding family adventures. Beyond the sheer thrill, sur ron脚踏 builds incredible confidence, sharpens coordination, and fosters a deep, lasting love for the outdoors. It’s a sport that teaches perseverance, mechanical basics, and respect for equipment and environment. But for a parent standing at the starting line, the journey from curiosity to that first successful ride can feel daunting, filled with questions about safety, cost, and where to even begin.
This guide is designed to be your comprehensive, trustworthy roadmap. Compiled from industry standards, safety manuals, and the hard-earned experience of seasoned riders and parents, our goal is to transform your uncertainty into confidence. Whether you’re just exploring the idea, researching first bikes, or looking to upgrade your young rider, we’ll walk you through every critical step. We’ll start with the non-negotiable foundation of safety, demystify how to choose the right size and type of bike, highlight key features for beginners, and provide a practical, step-by-step plan for getting started. Let’s shift this adventure into gear.
Safety First: The Non-Negotiable Foundation for Kids’ Dirt Biking
Before we discuss horsepower or suspension, we must address the single most important aspect of youth riding: safety. This isn’t about wrapping kids in bubble wrap; it’s about empowering them with the right knowledge and equipment to manage risk and build skills confidently. A safe rider is a happy, progressing rider. View this section not as a list of obstacles, but as the essential toolkit for ensuring your family’s dirt biking story is a long and joyful one.
Essential Protective Gear (The Head-to-Toe Kit)
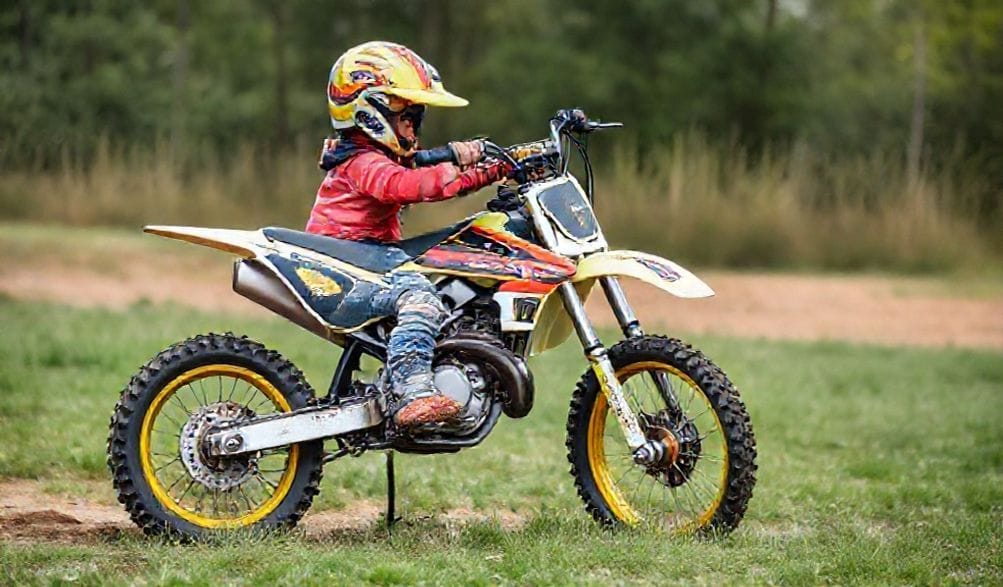
Gear is your child’s primary line of defense. It is not an area for compromise, ill-fitting hand-me-downs, or “good enough.” Investing in proper, high-quality gear is as important as buying the bike itself. Here’s the head-to-toe breakdown:
- 头盔: This is paramount. It must be DOT认证的 at a minimum, with SNELL certification being the gold standard for 越野摩托. Fit is critical—it should be snug without pressure points, and the chin strap must be securely fastened every single ride. Let your child help choose the graphics; a helmet they love is one they’ll want to wear.
- 护目镜: Protect eyes from roost, dirt, branches, and UV rays. Look for a comfortable fit with the helmet, good ventilation to prevent fogging, and a scratch-resistant lens. Have multiple tear-off lenses or a roll-off system for muddy conditions.
- Chest Protector/Roost Defector: This piece guards the torso, shoulders, and back from flying debris, handlebar impacts, and falls. For younger beginners, a full chest protector is wise. As they advance, a lighter roost deflector may suffice.
- 手套: Riding gloves improve grip, protect hands from blisters, and shield them in a fall. Look for padded palms and good knuckle protection.
- 或 These are crucial. They protect one of the most vulnerable areas from impacts with the bike, rocks, and the ground. Many integrate with riding pants.
- 靴子: Do not use hiking boots or work boots. 越野摩托专用靴 are engineered with rigid soles, ankle support, and shin protection to prevent twists, breaks, and burns from the engine or exhaust. They must be over-the-ankle.
选择并准备安全的骑行环境
Where your child learns is as important as how they learn. The environment must match their skill level.
- Start in a Controlled, Open Area: A wide-open, flat field free of obstacles, traffic, and bystanders is ideal. A vacant lot or a friend’s large, private property is perfect. This gives them space to learn controls without navigational fear.
- Graduate to Designated Areas: As skills improve, seek out designated Off-Highway Vehicle (OHV) parks, trails, or motocross tracks. These areas are designed for the sport, with managed terrain and other riders who expect to see you. Avoid public hiking trails, forests where riding may be prohibited, and never on public streets or sidewalks.
- Pre-Ride Bike Check (Parent’s Job): Before every ride, make it a ritual to check the bike together: tire pressure, fuel/oil level, chain tension and lubrication, brake function, and that all nuts and bolts are tight.
Supervision and Riding Rules
You are the coach, safety officer, and cheerleader. Active, engaged supervision is non-negotiable for young riders.
- Be Present and Focused: Put your phone away. Watch your rider, the terrain, and other riders.
- Establish Fundamental Rules: Set clear, non-negotiable rules before the engine ever starts. Common examples include: No riding alone, ever. A defined speed limit for the day. Understanding and using hand signals for “stop” and “slow down.” Always staying within a designated, visible area. Stopping immediately if they feel unsure or lose control.
How to Choose the Right Dirt Bike for Your Child
With safety principles established, we can turn to the exciting part: choosing the machine. The right bike builds confidence; the wrong one can create fear and hinder progress. The goal is a motorcycle that fits your child’s physical size and current ability, not one they will “grow into.”
The #1 Rule: Proper Sizing by Age and Height
While age gives a general starting point, physical height and inseam are the true deciding factors. A bike that’s too tall or heavy is intimidating and uncontrollable. A bike that’s too small will be outgrown quickly and can feel unstable.
- The Sit Test: This is the gold standard. With the child in full gear, have them sit on the bike. They should be able to place the 双脚前脚掌平稳地放在地面上 comfortably. If they are on their tiptoes or can only get one foot down, the bike is too tall.
- 重量至关重要: A child must be able to maneuver the bike at a standstill. If they can’t pick it up off the side stand or wrestle it if it tips, it’s too heavy.
- General Sizing Guideline (Use as a starting point only):
- Ages 3-6 / Height 2′ – 3’6″: 50cc (Gas or Electric)
- Ages 7-9 / Height 3’6″ – 4’6″: 110cc (Gas) or equivalent Electric
- Ages 10-12 / Height 4’6″ – 5’2″: 125cc (Small Wheel)
- Ages 13+ / Height 5’2″ and up: 125cc (Big Wheel) to 250cc (beginner adult models)
Gas vs. Electric: Understanding Power Source Options
The traditional gas vs. electric debate is now a meaningful choice for parents.
- Gas-Powered Bikes (2-Stroke & 4-Stroke): The classic choice. They offer more peak power, a traditional riding experience, and longer ride times between refuels. However, they require regular maintenance (oil changes, air filter cleaning, spark plugs), are louder, and produce emissions. 4-strokes are generally more linear and easier for beginners than the “hit” of a 2-stroke powerband.
- Electric Dirt Bikes: A fantastic, modern option, especially for young beginners. They provide instant, controllable torque, are virtually silent (great for neighborhoods), and have almost zero maintenance (no oil, gas, or filters). They’re also cleaner to operate. The cons are limited range per charge (typically 1-2 hours), recharge time, and a less traditional feel. For a 4-8 year old’s first bike, electric is often the safest and simplest choice.
Key Features for Beginner and Youth Models
Look for these features that make learning easier and safer:
- 油门限位器: A screw or dial that physically restricts how far the throttle can be turned. Crucial for first-timers. You can open it up gradually as their skill and control improve.
- 自动离合器: Also known as a centrifugal clutch or “no-clutch” transmission. The bike shifts automatically as speed changes, allowing the rider to focus solely on throttle, brakes, and balance. Standard on most beginner bikes.
- Electric Start: A push-button is far easier and less frustrating for a small child than mastering a kick-starter.
- Adjustable Suspension: Some bikes allow you to soften the suspension spring preload, lowering the seat height slightly. This can extend the usable life of the bike by 6-12 months as your child grows.
Top Dirt Bike Picks for Kids by Age & Skill Level
Based on reliability, features, and community reputation, here are some standout models to consider. Always remember: the best bike is the one that fits your child.
Best Beginner Bikes (Ages 3-6)
- Razor MX350/MX650 (Electric): The quintessential first “bike.” Affordable, quiet, variable speed control, and very low to the ground. Perfect for seeing if a toddler has interest.
- Honda CRF50F (Gas): The legendary “Fifty.” Bulletproof 4-stroke reliability, automatic clutch, and a reputation for indestructibility. It’s the benchmark for a reason.
- Stacyc 12eDrive/16eDrive (Electric): A premium, bike-like electric trainer. Designed like a real dirt bike with adjustable seat height, hand brakes, and multiple speed settings. Excellent for building proper technique from day one.
Best Bikes for Growing Riders (Ages 7-11)
- Yamaha TT-R110E (Gas): A step up from the 50cc class. Electric start, automatic clutch, and a friendly power delivery. A fantastic “next bike” that’s manageable but has room to grow.
- KTM 50 SX (Gas – 2-Stroke): For the child who shows immediate talent and aggression. A high-performance, lightweight 2-stroke for mini motocross racing. Not a beginner bike—for advancing riders only.
- Sur-Ron Light Bee Youth (Electric): A powerful, high-quality electric option for older kids in this range. Offers more performance and range than toy-grade electrics, bridging the gap to full-size bikes.
Bikes for Advancing Tweens & Teens (Ages 12+)
- Kawasaki KLX110R (Gas): The dominant player in the 110cc class. Slightly more performance-oriented than the Yamaha TT-R, often with better suspension. A great all-around bike for trail and track.
- Honda CRF125F (Gas): This comes in Small Wheel (for shorter riders) and Big Wheel versions. It introduces a manual clutch in a very manageable package, making it the perfect bike to learn clutch control before moving to full-size machines.
- Beta Evo 80 (Gas – 2-Stroke Trials): A different direction. A trials bike focuses on ultra-slow, technical balance and obstacle climbing over speed. Incredible for building supreme bike control and confidence.
Getting Started: Your Family’s Path to the First Ride
You have the gear, you have the bike—now let’s translate that into a positive first experience. The goal of the first day is fun and comfort, not distance or speed.
Pre-Ride Preparation and Bike Setup
- 组装: If the bike is new-in-box, assemble it carefully per instructions or have a dealer do it.
- Control Adjustment: Adjust the clutch and brake levers so your child can reach them comfortably with one or two fingers while their grip is on the throttle.
- Throttle Limiter: Set it to the minimum setting. You can increase it later. This is your most important safety setup.
The First Lesson: Basic Controls and Drills
- Static Lesson (Bike OFF): Have them sit on the bike. Point out and name every control: throttle (twist to go), front brake (lever), rear brake (pedal), kill switch (the most important button!). Have them practice operating each.
- 动力推行: With the bike on (but throttle limiter set low), have them walk it around using their feet, getting a feel for the weight and using the throttle slightly to help. They are not sitting yet.
- Coasting Drill: Find a very gentle slope. Have them sit, lift their feet, and coast down, focusing on balance and using the brakes to stop. Repeat until comfortable.
- First Powered Rides: On flat ground, have them practice starting, riding in a straight line for 50 feet, and stopping smoothly. Then move to wide, gentle turns. Keep sessions short (20-30 minutes) to avoid fatigue.
Maintenance Basics for Parents
You don’t need to be a mechanic, but basic upkeep ensures safety and longevity.
- 每次骑行后: 擦拭摩托车,检查有无部件松动。.
- 每次骑行前: TCLOCS检查法: 轮胎(胎压/磨损)、操控装置(手把、油门、线缆)、灯光/油液(燃油和机油油位)、车架(车架、螺栓)、支架(侧支架)。.
- 定期维护: 定期清洁并润滑空气滤清器(脏污的空气是发动机杀手)。保持链条张紧度适当并充分润滑。按照手册规定的时间间隔更换机油。对于任何复杂问题,请与当地一家优秀的维修店建立良好关系。.
Frequently Asked Questions (FAQ) About Kids’ Dirt Bikes
Q1:孩子几岁开始骑越野摩托车最合适?
答: It’s less about a specific age and more about 准备就绪的迹象. 。他们能听从多步骤指令吗?他们是否具备在没有辅助轮的情况下骑脚踏车的身体协调能力?他们是表现出真正的兴趣,而不仅仅是迫于父母的压力吗?如果配备合适的小型摩托车(通常是电动的),许多孩子在4到6岁之间就准备好了。.
Q2:电动越野摩托车是孩子们的好选择吗?
答: 绝对是。对于初学者来说,它们通常是 理想的选择. 。其安静的操作能减少孩子的恐惧和邻里投诉,即时但可控的动力容错性高,并且无需维护对父母来说是一大优点。如果将来想过渡到燃油摩托车,它们能为平衡和控制打下极好的基础。.
Q3: How much should I expect to spend on a kid’s dirt bike and gear?
答: 设定一个现实的预算。一辆新的、优质的入门级燃油摩托车(例如CRF50F)起价约为 1,500 – 2,200元. 。一辆好的电动训练车价格在 $300 – $1,500. 之间。高质量的新安全装备(头盔、靴子、胸甲等)是另一项必要投资,大约需要500 – 1,000美元。. 购买二手装备(头盔除外)和二手摩托车可以显著降低成本,但务必仔细检查。.
Q4:我的孩子在哪里骑行合法且安全?
答: 这一点必须仔细研究。. 在公共街道、人行道或大多数公共公园骑行几乎都是不合法的。最安全、最合法的地点是:1) Private property with the owner’s explicit permission, 私人土地(需获得所有者许可),以及2) 指定的非公路车辆区域、允许越野车使用的州立森林或私人越野摩托车赛道。. Check your state’s Department of Natural Resources website for OHV maps and regulations.
结论
与您的孩子一起开启越野摩托车之旅,其意义远不止于一辆摩托车。它关乎建立能延伸到生活其他方面的自信心,在广阔户外创造无可替代的家庭回忆,并教导关于责任感、专注力和毅力的课程。通往成功的道路建立在三个坚定不移的支柱之上: 优先考虑安全 ,配备全套防护装备;, 选择尺寸正确的摩托车 ,基于合身度而非年龄;以及 致力于在有监督下进行渐进式学习。.
相信这个过程。从一开始就投资于培训和优质装备。庆祝每一个小胜利——第一次成功启动、第一次平稳转弯、第一次自己扶起摩托车。将这段经历围绕乐趣和技能培养来构建,而非竞争。与您当地的骑行社区建立联系;其他父母是宝贵的支持和建议来源。.
现在,我们期待听到您的声音!您还有什么问题?请在下方评论中分享您家庭的入门故事。请记住,最好的下一步通常是前往授权经销商处,让孩子试坐不同型号的摩托车,找到最适合他们的那一款。骑行愉快!
METADATA_START—
DISPLAY_TITLE: The Ultimate Parent’s Guide to Dirt Bikes for Kids: Safety, Sizing & Starting Out
搜索引擎优化标题:儿童越野摩托车:2024年家长安全与购买指南
元描述:自信地为您的孩子选择合适的越野摩托车。我们的专家家长指南涵盖安全装备、正确尺寸选择(燃油 vs. 电动)、2024年按年龄推荐车型,以及首次骑行的分步计划。.
图片提示:一个快乐、安全装备齐全的孩子(戴着头盔、护目镜、胸甲和靴子)自信地坐在一辆小型越野摩托车上,背景是阳光明媚的开阔田野,一位面带微笑的家长站在旁边竖起大拇指。.
—METADATA_END—