Sur Ron链轮终极指南:性能、兼容性与升级方案
是否感觉您的 速珂 无法提供渴望的加速感,或极速未达预期?您可能已调整控制器设置,甚至考虑过电池升级,但实现颠覆性改变的关键往往在于一个微小、低调却强大的部件: 链轮. **链轮**。这个单独齿轮是决定车辆动力如何传递至地面的最终仲裁者,显著影响着整车的性能特性。.
无论您是寻求在陡峭技术性爬坡中获得更强扭矩的越野骑手,还是渴望在铺装路面上追求更高极速的街道骑手,理解链轮选择都是一项核心性能调校技能。更换链轮是性价比最高、效果最显著的机械升级之一。本综合指南融合专业机械知识与真实骑行经验,为您解析链轮的奥秘。我们将助您做出明智的升级决策,使其完美契合您的骑行风格,确保您从 电动自行车.
**理解链轮:Sur Ron传动系统的核心**
在更换部件前,理解链轮的作用及其尺寸为何如此关键至关重要。这不仅仅是安装一个新金属件,而是重新塑造您爱车的性格。.
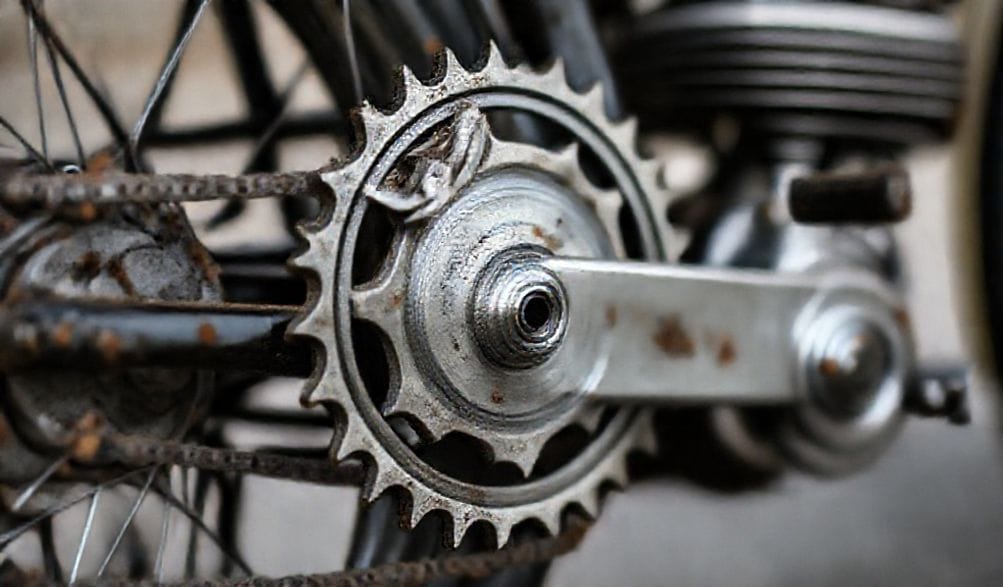
**什么是链轮?它在Sur Ron上如何工作?**
链轮本质上是一个带齿的轮子,设计用于与 链条, **链条**啮合,将旋转力从一点传递到另一点。在您的Sur Ron上,该系统简洁而优雅。电力驱动电机旋转 **前链轮** (也称为副轴或驱动链轮)。该链轮通过重型摩托车链条连接到 **后链轮**,, 后者直接固定于后轮毂。.
这就构成了一个 **单级减速驱动系统**。. 电机以极高转速旋转,链轮组合的任务是降低该转速,同时将扭矩倍增到足以推动车辆和骑手的水平。这两个链轮之间的比例—— **最终传动比**——是一切的关键。改变此比例,即改变了您骑行Sur Ron的根本体验。.
**齿数的关键作用:扭矩 vs. 速度**
其魔力与计算全在于齿数。可以将其类比于自行车齿轮。较小的前齿轮和较大的后齿轮使爬陡坡非常轻松,但在平路上会很快达到踩踏极限。反之,较大的前齿轮和较小的后齿轮起步更费力,但一旦动起来则允许达到更高速度。.
同样的原理直接适用于您的Sur Ron链轮配置。规则很简单:
- **增加后链轮齿数(或减少前链轮齿数):** 这就构成了一个 获得**更低(更短)的传动比**。. 电机驱动后轮所需负荷减小,从而在低速时产生 **更大的扭矩和轮上功率**。. 您将获得爆发性加速、更好的爬坡能力,以及在技术地形中更可控的动力。代价是电机会更快达到其转速极限,, **降低您的潜在极速**。.
- **减少后链轮齿数(或增加前链轮齿数):** 这就构成了一个 获得**更高(更长)的传动比**。. 电机驱动车轮需要更费力,这会 **削弱低扭和加速能力**。. 然而,它使得电机在特定道路速度下能以更低转速运行,从而在触及电机电子或物理极限之前, **提升您的潜在极速**。 简而言之:.
**齿数多 = 扭矩大,极速低。齿数少 = 扭矩小,极速高。** 您的升级路径完全取决于您希望侧重等式的哪一边。. **为您的骑行选择正确的Sur Ron链轮**.
既然理解了理论,让我们将其应用于实际骑行。并不存在孤立意义上的“最佳”Sur Ron链轮——最适合您地形和目标的那一个才是最佳之选。
**原厂配置分析:出厂设置**.
Sur Ron出厂时选择的链轮尺寸是一种通用性折衷方案。对于流行的
**Light Bee型号**, 确认套件专用于您的车型——, 标准配置通常是 **12齿前链轮** 以及 搭配**56齿后链轮**。. 这提供了适用于混合越野与轻度街道骑行的平衡感。 Light Bee **Storm Bee型号**则通常配备相似或略有变化的齿比,以适应其增加的动力和重量。此原厂齿比设计为大多数骑手提供了一个安全、可用的起点,但很少针对任何特定极限场景进行优化。.
**升级场景:根据地形匹配链轮尺寸**
在此,您可以定制您的爱车。让我们分解不同骑行风格的理想升级方案:
-
**针对技术性小径与爬坡:** 如果您的游乐场是陡峭、多石、树根密布的单行小径,其中控制和低扭为王,那么您需要更多扭矩。.
- Q2:开启底盘灯时,电池能持续多久? **增加您的** **后链轮**,. **后链轮尺寸**。 常见的升级是换用**58齿、60齿甚至62齿**的后链轮。 这种更低的齿比为您提供从静止起步的惊人牵引力,允许您通过精确的油门控制爬越障碍,并使陡峭爬坡感觉轻松。车辆在狭窄局促的地形中将感觉更“灵动”和响应迅速。.
-
**针对街道与极速:** 如果您主要在铺装路面、防火道或开阔区域骑行,并希望降低高速时“高频震动”的感觉,那么您需要更高的齿比。.
- Q2:开启底盘灯时,电池能持续多久? **减小您的** **后链轮**, **后链轮尺寸**(例如,换用 **52齿或54齿**),) 或 或者**增加您的** **前副轴链轮尺寸** (换用**13齿或14齿**)。 13T or 14T). Changing the front sprocket is often simpler and has a more pronounced effect per tooth change. This gearing lets the motor relax at cruising speeds, reduces wear, and can unlock 5-10+ mph of additional top speed, depending on the change and your bike’s setup. Be prepared for noticeably softer acceleration from a stop.
-
For Mixed Use & Balanced Performance: If you want a subtle nudge in one direction without sacrificing too much of the other, opt for a minor change.
- Q2:开启底盘灯时,电池能持续多久? A -1 tooth change on the front sprocket (from 12T to 11T) is a popular, low-cost mod that gives a noticeable bump in torque across the range for better trail manners while only slightly impacting top speed. Conversely, a +1 front / -2 rear change can slightly calm the bike down for more street-biased mixed use.
Material and Build Quality: Aluminum vs. Steel
Not all sprockets are created equal. The two main materials you’ll encounter are:
- 钢制链轮: The workhorse choice. (例如约165磅)。行驶更稳定。 | but incredibly durable and long-lasting. Steel sprockets can withstand a tremendous amount of abuse, grit, and poor chain maintenance before showing significant wear. They are almost always the most cost-effective option over the long term, especially for off-road riders. The added weight is negligible for most riders compared to the durability benefit.
- 铝制链轮: The performance choice. 重量显著减轻 than steel, which reduces unsprung rotational mass. This can translate to a slightly more responsive feel in acceleration and suspension action. However, aluminum is a softer metal and will wear out much faster, particularly if run with a dirty or poorly maintained chain. They are often more expensive.
Our Recommendation: For 90% of riders, a high-quality steel sprocket is the smartest buy. The longevity is superior, and the performance difference from the minimal weight savings of aluminum is hard to perceive for most. Save aluminum for dedicated race bikes where every gram counts and the sprocket will be replaced frequently as part of maintenance.
Step-by-Step: How to Replace Your Sur Ron Sprocket
Ready to make the swap? With basic tools and patience, this is a very manageable DIY job. Here’s a trusted, first-hand method.
Tools You’ll Need for the Job
- Rear stand or a way to securely lift and support the rear of the bike.
- Correct size socket/wrench for the rear axle nut (typically 22mm or 24mm).
- Hex keys (Allen wrenches) for the sprocket bolts (typically 8mm).
- Socket or wrench for the brake caliper bolts (if caliper removal is needed for clearance).
- Chain tool (for breaking and riveting the chain, if replacing it).
- Torque wrench (highly recommended for critical bolts).
- Gloves, rag, and brush for cleaning.
- Threadlocker (blue Loctite) for sprocket and axle bolts.
Safe Removal of the Rear Wheel and Old Sprocket
- 清洁过程:注意事项 Place the bike on a sturdy rear stand so the rear wheel is off the ground.
- Release Chain Tension: Locate the chain tensioners on the swingarm. Loosen the locknuts and back off the adjustment bolts to provide maximum slack in the chain.
- Remove the Chain: Slide the chain off the rear sprocket. You may need to break the chain with your chain tool if you are replacing it.
- 拆卸后轮: Loosen the axle nut. You may need to loosen the brake caliper bolts and slide the caliper off the rotor for clearance. Support the wheel and pull the axle out completely. Carefully lower the wheel out of the swingarm, minding the brake rotor and spacers.
- Remove the Old Sprocket: Secure the wheel. Using the correct hex key, remove the 4-6 bolts holding the sprocket to the hub carrier. The sprocket should now lift off. Note the orientation of any spacers or washers.
Installation, Alignment, and Chain Tensioning
- Install the New Sprocket: Place the new sprocket onto the hub, ensuring it seats fully against any registration lip. Apply a drop of blue Loctite to the threads of the sprocket bolts and tighten them down evenly in a criss-cross pattern. Torque to the manufacturer’s specification (if unknown, a good general rule is 25-30 ft-lbs).
- Re-install the Rear Wheel: Carefully lift the wheel back into the swingarm, aligning the chain and ensuring the brake rotor slots into the caliper (if you removed it). Re-insert the axle and hand-tighten the nut.
- Set Chain Tension: This is critical. Push the wheel forward and begin tightening the chain tensioner bolts evenly on both sides. You want about 20-30mm (3/4 to 1 inch) of total up-and-down play at the midpoint of the lower chain run. Use a ruler to measure precisely. Uneven tensioners will misalign the wheel.
- Check Alignment: Look directly from behind the bike. The front and rear sprockets should be in perfect vertical alignment. Many riders use a straightedge or a laser tool. Misalignment causes rapid chain and sprocket wear.
- 最终扭矩: Once alignment and tension are perfect, torque the rear axle nut to spec (typically 80-100 ft-lbs). Re-torque the sprocket bolts after your first short ride, as they can settle.
Maximizing Your Investment: Maintenance & Compatibility
A new sprocket is an investment. Protect it with proper care and ensure everything works together harmoniously.
Sprocket and Chain Care for Longevity
- Clean Regularly: After muddy or dusty rides, clean your chain and sprocket with a dedicated chain cleaner or a brush and degreaser. Grit is the number one enemy of drivetrain components.
- Lubricate Properly: Once clean and dry, apply a quality motorcycle chain lube. Wipe off excess to avoid attracting more dirt.
- Inspect for Wear: A worn chain will destroy a new sprocket in no time. Check for “stretch” (using a chain wear tool) and look for “hooked” or sharply pointed teeth on the sprocket. If you see hooked teeth, the sprocket and chain should be replaced as a set.
Important Compatibility Considerations
- 。车型虽相似,但电机轴花键和后轮毂螺栓孔距可能存在差异。 Sur Ron 使用 #420 链条. 。此编号规定了链条的节距(销轴间距)和宽度。请勿尝试使用其他规格的链条(如 #428 或 #520)。购买新链条时,请确保其为高品质的 #420 O型环或X型环链条 以确保耐用性。.
- 螺栓孔型: Sur Ron 轮毂采用特定的螺栓圆直径(BCD)和螺栓数量。大多数改装链轮均按此标准制造,但购买前请务必核实。标准配置通常为 4 螺栓孔型。.
- 刹车盘间隙: 此项对于大型后链轮升级(60齿以上)至关重要。链轮直径增大会使其极度接近甚至接触后刹车盘或卡钳,存在危险。骑行前务必进行试装并空转车轮以检查间隙。某些配置可能需要使用薄型刹车盘垫片。.
常见问题解答
问:更换链轮会使我的 Sur Ron 保修失效吗?
答:若故障直接归因于改装,则传动系统改装 可能 会影响相关部件(链条、电机输出轴、轴承)的保修范围。最好向您的特定经销商或 Luna Cycle 咨询其官方政策。大幅增加负荷的改装(例如为极端爬坡使用超大后链轮)比简单的单齿改动风险更高。.
问:使用更小的链轮能增加多少极速?
答:变化是成比例的。粗略估计,后链轮减少 1 齿(例如从 56T 到 55T)可能使理论极速提高 1-2 英里/小时。更常见的改动,如将后链轮从 56T 改为 52T,可能带来 5-8 英里/小时的提升,前提是电机有足够功率来克服更高传动比带来的负荷以及该速度下的空气阻力。.
问:更换链轮时需要同时更换链条吗?
答:强烈建议 这样做,特别是当您的链条已行驶相当里程. 时。新链轮与旧的磨损(拉伸)链条啮合将无法正确就位,导致两者加速磨损——这实则得不偿失。如果您的链条经确认在磨损限度内,且您只进行极小的齿数改动,通常可使用链条工具调整其长度。.
问:我可以更换前链轮(副轴链轮)而不是后链轮吗?
答:当然可以。这通常是更简单、更经济的第一步,因为它无需拆卸车轮。请记住这个规律: 增加前链轮齿数类似于减少后链轮齿数(旨在提高速度),而减少前链轮齿数则类似于增加后链轮齿数(旨在增加扭矩)。. 前链轮改变 1 齿对传动比的影响远大于后链轮改变 1 齿。.
问:我为提升极速更换链轮后,加速感觉乏力。怎么回事?
答:这并无问题——这是根本的、预期的权衡结果。您通过让电机以“更高”的齿比驱动,改变了最终传动比以偏向更高速度。现在后轮获得的机械优势(扭矩放大)减小,因此起步感觉冲击力减弱。您是用低端爆发力换取了高速续航能力。.
结论
选择适合的 更换 Sur Ron 链轮 不仅仅是一个简单的零件替换;它是一项定制您爱车灵魂的实践。通过理解齿数、扭矩和速度之间的核心关系,您将超越猜测,进入精准调校的领域。无论您寻求征服山峦的拖拉机般牵引力,还是驰骋小径的更长续航能力,总有一款完美的链轮适合您。.
请记住,最佳的升级是服务于您特定骑行风格的那一个。不存在一个适用于所有人的“最佳”链轮。优先选择信誉良好的制造商生产的高质量部件,搭配一条全新的、保养得当的链条,并精心精准地安装。现在,掌握了这些知识,您可以信心十足地进行改装了。去安装上新齿轮,以全新的视角体验您的 Sur Ron 吧。.
元数据开始—
显示标题:Sur Ron 链轮终极指南:调校扭矩与极速
搜索引擎优化标题:Sur Ron 链轮指南:如何根据扭矩或速度选择 | DIY 升级
元描述:通过我们完整的链轮指南掌控您的 Sur Ron 性能。了解齿数如何影响扭矩和速度,为越野或街道选择正确的升级方案,并获取分步 DIY 安装说明。.
图片提示:一张特写细节照片,内容为一只闪亮的新钢制链轮(齿形锋利)与一只来自 Sur Ron 电动越野车的磨损原装链轮并置,旁边摆放着一条干净的 #420 摩托车链条,所有物品置于工作台上,背景中有工具。.
—元数据结束—